
Username/Password Extraction: Dynamic, Static, and Unlimited
Category: Proxy Extraction | Updated: 2026-09-14
Seven steps to complete the username/password authentication: from the preparation of the sub-account to the delivery of the results, each step clearly states the interface location, fill in the contents and expected results.
On this page:
- Step 1: Prepare sub-accounts (authentication account management)
- Step 2: Dynamic residential proxy · username/password extraction
- Step 3: Static residential proxy · Traffic mode extraction
- Step 4: Static residential proxy · Bandwidth mode extraction
- Step 5: Unlimited Residential Proxy Extraction
- Step 6: Verify that the extraction results are available
- Step 7: Deliver the results to the target end
This page is the complete operation manual of the "username/password authentication" method: first prepare the sub-account, then generate the proxy by the product line, and finally verify the connectivity. The operating differences of the four product lines (Dynamic Residential/Static - Traffic/Static - Bandwidth/Unlimited) have been marked item by item.
① Prepare sub-account → ② Fill in the extraction parameters → ③ Generation proxy → ④ Copy the results → ⑤ Verify connectivity → ⑥ Delivery to the target end
Please confirm before starting work ① The machine or predecessor node has been in an overseas network environment; ② The target product line shows "Activated"; ③ The authentication method has been read and selected, confirming that the username/password authentication is required this time.
Step 1: Prepare Sub-Account (Authentication Account Management)
All credentials for account pin authentication come from sub-accounts. The sub-account determines both whether it can be connected and how much it can run, so pair and register it first.
- Go to Authentication Account Management
- Interface location: Dynamic residential → proxy using → authentication account management (label is on the second level of the page)
- How it works: Click on the Authentication Account Management tab and wait for the list to load.
- Expected results: See a list of sub-accounts, status columns, and “Up to 10 sub-users” prompt.
- Check for existing sub-accounts (one will be created by default)
- Interface position: two columns of the list "Status" "Product type"
- How to do it: Confirm "Status = Enabled", "Product type = Product line to be used this time" line by line.
- Expected results: All are enabled; if there is a "disabled" or product type mismatch, click "Edit" in the action column to correct it.
- Create a new sub-account on demand
- Interface position: “Add” button above the list
- How it works: Click "Add", fill in the username, password (subject to page password rules), product type, traffic usage limit, daily traffic limit, notes, and click "Submit".
- Fill in: Suggested name:
Business - Region - Serial Number, e.g.ads-us-01; Comments are written for clear purpose. - Expected results: A new row is added to the list and the status is Enabled.
- Set quota (strongly recommended)
- Interface location: Edit the "Traffic usage cap (GB)" "Daily traffic cap (GB)" in the authentication account pop-up
- How it works: Filled in as per business budget; daily caps reset as per UTC 0 points. Leave blank if no individual restriction is required.
- Expected results: Reopen the edit pop-up to confirm that the values have been saved.
- (anytime) reconcile primary and sub-account usage in Dashboard
- Interface Location: Dynamic Residential Proxy → Statistics
- How it works: Toggle between viewing the main account (a summary of the entire plan) and the sub-accounts (usage for each authentication account).
- Expected results: The sum of the usage of each sub-account is consistent with the summary of the main account; if there is an exception, you can directly locate the business attribution in the specific sub-account and its notes.
- Record Password
- Interface position: Edit the Password field in the pop-up
- How it works: Register your password in your team's credential management tool.
- Tip: The password is only visible during setup. If it is lost, it needs to be reset here. After resetting, all proxies using the sub-account will be invalid, and the business configuration needs to be updated simultaneously.
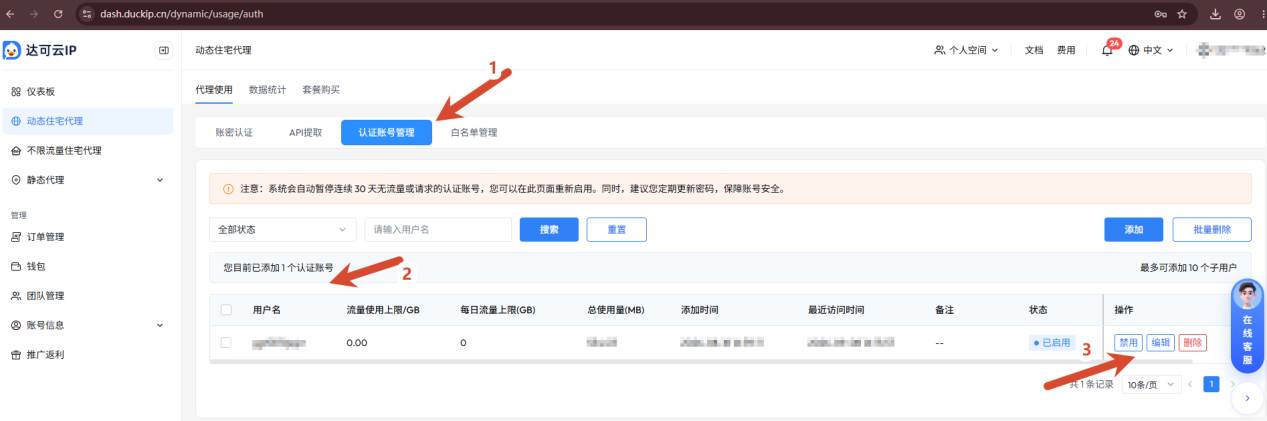
Look at three places: ① The label location ② The account has been added ③ The in-line operation button opens the authentication account management tab, checks the status, product type and quota; can be disabled/edited/deleted in-line
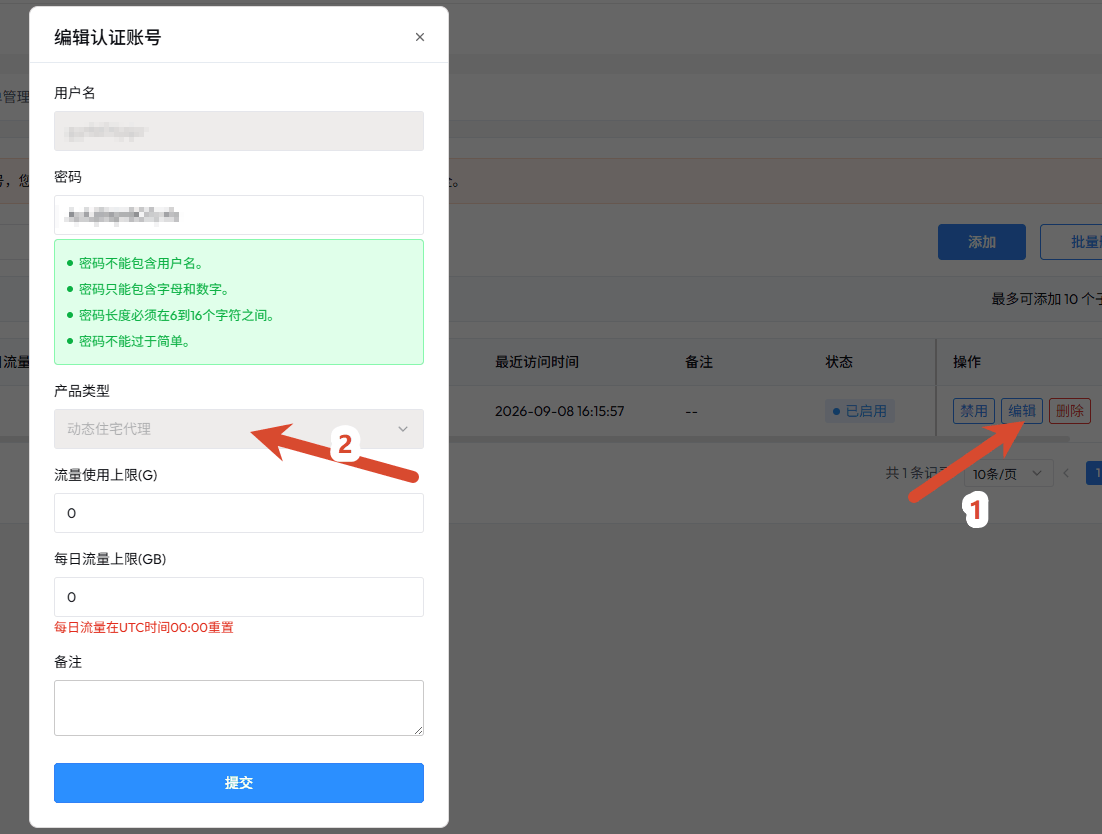
Callout 1 shows the edit action. Callout 2 shows the product selector. In this dialog, you can change the password, bind a product, and set total and daily traffic limits. Daily limits reset at 00:00 UTC.
| Field | Description | Suggestions |
|---|---|---|
| Username / password | Proxy credentials. The password must meet the strength requirements shown on the page. | Assign separate sub-accounts to different workloads so usage and quota issues are easier to trace. |
| Product type | The product line associated with the sub-account (such as dynamic residential proxy) | The sub-account is bound to the plan: be sure to match the product line you want to extract, otherwise "account unavailable" will appear; sub-accounts of different plans cannot be mixed. |
| Traffic usage cap (GB) | The total amount of traffic that can be consumed by this sub-account | Set by business budget; leave blank for no individual limit. |
| Daily traffic limit (GB) | Daily traffic allowance, reset at 00:00 UTC. | Set a limit to stop unexpected traffic consumption automatically. |
| Remarks | Custom description. | Record the purpose, such as "AdsPower - US - Profile 01," so teammates can identify it. |
| Status | Enabled/Disabled | Confirmed as Enabled prior to extraction. |
Example host is not a fixed value
us.duckip.net:1000(dynamic residential proxy) andas.duckip.net:2000(static residential proxy) are documentation examples. Host prefixes vary by region and product. Always use the host and port copied from your dashboard.
Two hard constraints
- The number of sub-accounts is limited. The current page indicates a maximum of 10 sub-users, so allocate them by workload rather than creating one for every profile. 2. An authentication account with no traffic or requests for 30 consecutive days is suspended automatically. Reactivate it on this page before reuse.
Step 2: Dynamic Residential Proxy · Username/Password Extraction
The Username/Password Authentication page places settings on the left and generated results on the right. Complete the following steps in order.
- Select Authentication Account
- Interface location: left drop-down box for "Proxy Settings → Select Authentication Account"
- How it works: Scroll down to select the activated sub-account checked in the first step; the list is empty and the dot to the right is "+ Add sub-account".
- Expected results: The drop-down box shows the name of the sub-account that was selected.
- Select code language (determines the output format of the result)
- Interface position: "Select code language" set of horizontal buttons
- How to operate: Select by destination: select "Batch generation" for batch configuration of antidetect browser; select "General mode" for manual completion of client software; select "Shell" for connectivity only; select the corresponding language for program integration.
- Expected results: The button is highlighted and the results preview area on the right syncs to the selected format.
- Select a country
- Interface position: Select country drop-down box
- How it works: Select the target country, such as the United States, Germany, Hong Kong, China; choose global mixing when orientation is not required.
- Expected result: A fragment in the form of
area-XXappears in the parameter description on the right.
- Select a state/city (optional)
- Interface position: "Select state" "Select city" drop-down box
- How it works: Target by country only, country and state, or country, state, and city. Leave the fields set to Random when finer targeting is unnecessary.
- Expected result: The
state-/city-segment in the generated result after selection is consistent with your selection.
- Select ASN (optional)
- Interface position: "Select ASN" drop-down box
- How to operate: Select the corresponding ASN when the operator needs to be specified, otherwise leave "Random".
- Tip: More specific ASN targeting reduces the available IP pool. Start with Random when validating the connection.
- Set proxy area
- Interface position: "Proxy area" drop-down box
- How it works: In principle, select the region where the target country is located (for example, the Americas region); select "Smart" if you are unsure or do not need it.
- Expected outcome: Does not conflict with the Country (e.g. do not restrict to the European region when choosing the US).
- Confirm port, username, and password
- Interface location: "Proxy port" "Proxy account" "Proxy password" three fields
- How it works: Keep it default (example port
1000); the username and password will automatically take over the selected sub-account without having to enter it manually. - Tip: All three items have a copy button, and the final result will be automatically included in the generated result, so there is no need to record it separately.
- Set the IP lifetime
- Interface position: "IP Lifetime" drop-down box
- How to operate: Choose Rotate on Every Request for rotating collection tasks. Choose Specify Duration and enter an IP duration of 1–120 minutes when the egress IP must remain stable.
- Expected result:
life-segment appears in the result on the right.
- Fill in session (when sticky is required)
- Interface position: "session" input box
- How to do it: Enter up to 12 characters, or use Batch Generation to assign sessions automatically. Keep the same session for the same browser profile.
- Expected results: The same session reuses an IP within the configured lifetime; different sessions receive different IPs.
- Click "Generate Proxy" and copy the results
- Interface position: "Get proxy list" area on the right
- How it works: Click "Generate Proxy", confirm the results, and click "Copy".
- Expected result: The full four items of information appear in the result box, consistent with the selected parameter.
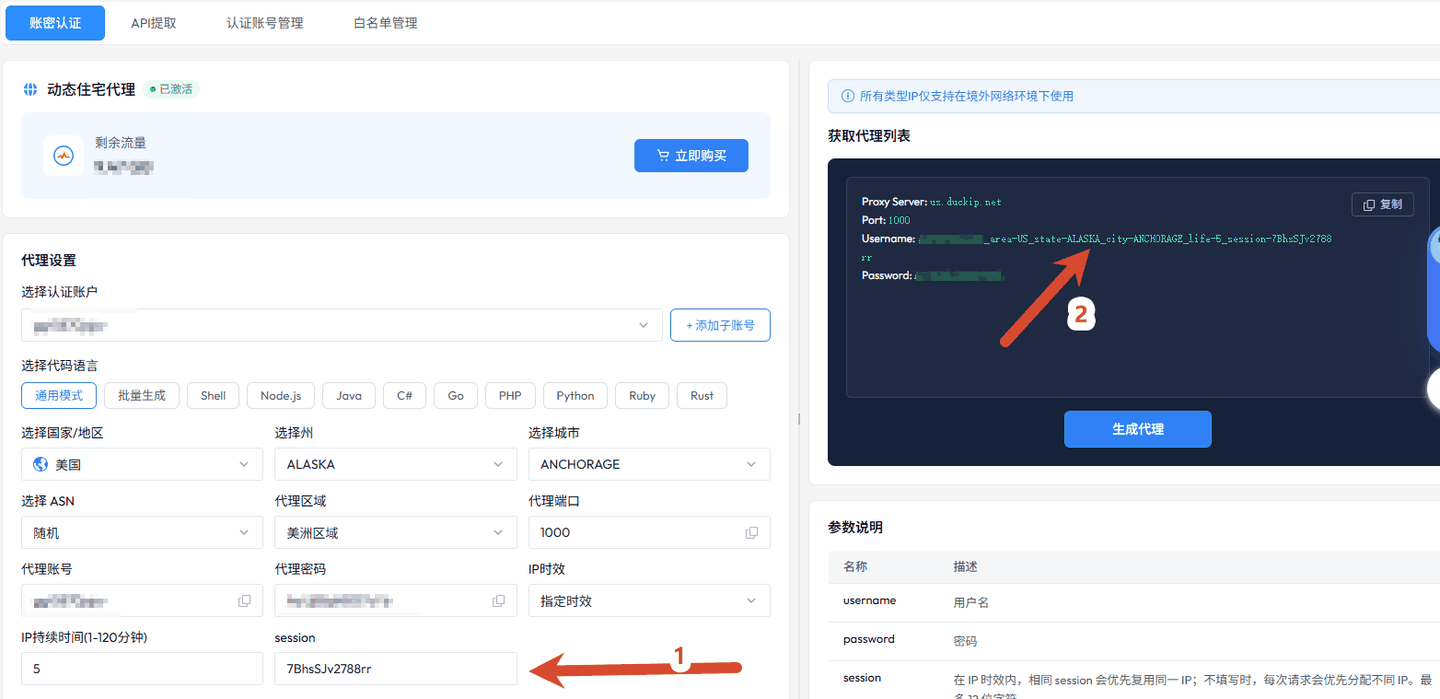
See how the left and right columns correspond to "proxy settings" on the left and "get proxy list" on the right; any parameter changes will be synchronized to the results and parameter descriptions on the right
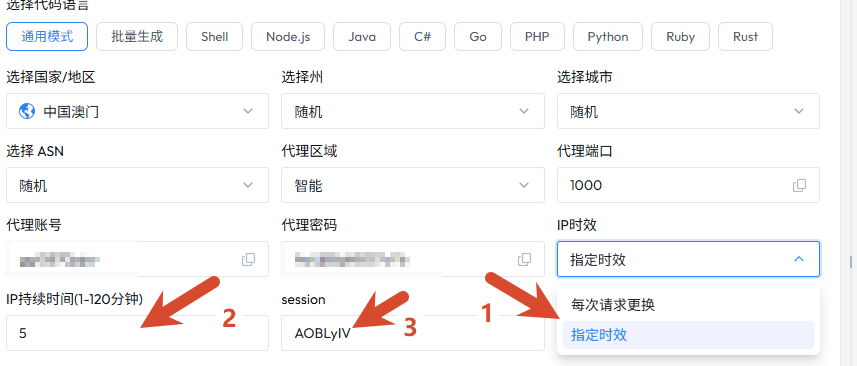
Callouts 1–3 show Specify Duration, the IP duration (five minutes in this example), and the session field.
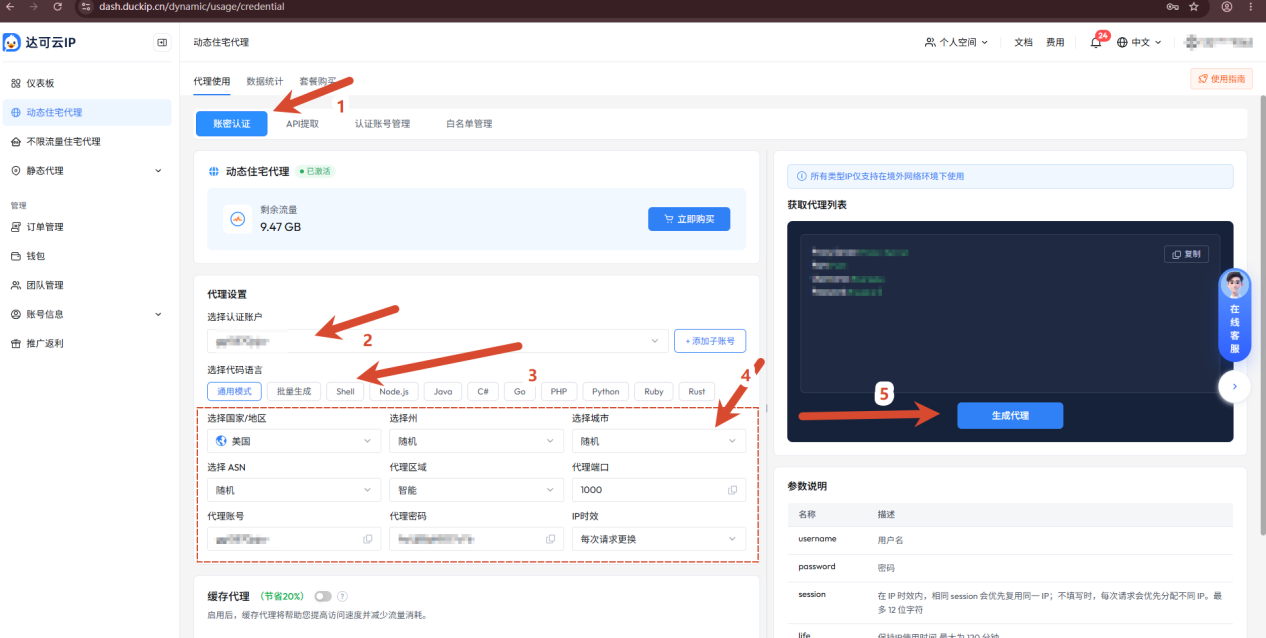
Selecting Rotate on Every Request updates the generated proxy and parameter description on the right. The credentials shown in the example are masked.
What does the result look like?
General Mode output field structure for easy item-by-item paste; Batch Generate outputs in a compact batch format:
Proxy Server: us.duckip.net
Port: 1000
Username: subaccount_area-US_state-ALASKA_city-ANCHORAGE_life-5_session-7BhsSJv2788rr
Password: subaccount_password
us.duckip.net:1000:subaccount_area-US_state-ALASKA_city-ANCHORAGE_life-5_session-PNggyYDd:subaccount_password
us.duckip.net:1000:subaccount_area-US_state-ALASKA_city-ANCHORAGE_life-5_session-mgxL1YIa8Fpd:subaccount_password| Result Format | What it looks like | Ideal for pasting into |
|---|---|---|
| Universal Mode | Proxy Server / Port / Username / Password Four Lines | Mobile App, Emulator, Desktop Software Proxy Settings Page |
| Batch Generation | Line by Line: host:port:user:pass | Batch Import, Proxy Manager, Proxy Pool Scripts for antidetect browser |
| Shell | Directly Executable curl Commands | Terminal Connectivity Testing |
| Programming Language | Code Block with Proxy Call Skeleton | Python/Node.js/Go/Java/PHP/C#/Ruby/Rust Project |
Recommended practices
The proxy server is preferred for batch extraction: Port: Username: Password Four-part format, which can be directly recognized by the antidetect browser and most proxy managers; confirm the paste separator supported by the target before generating.
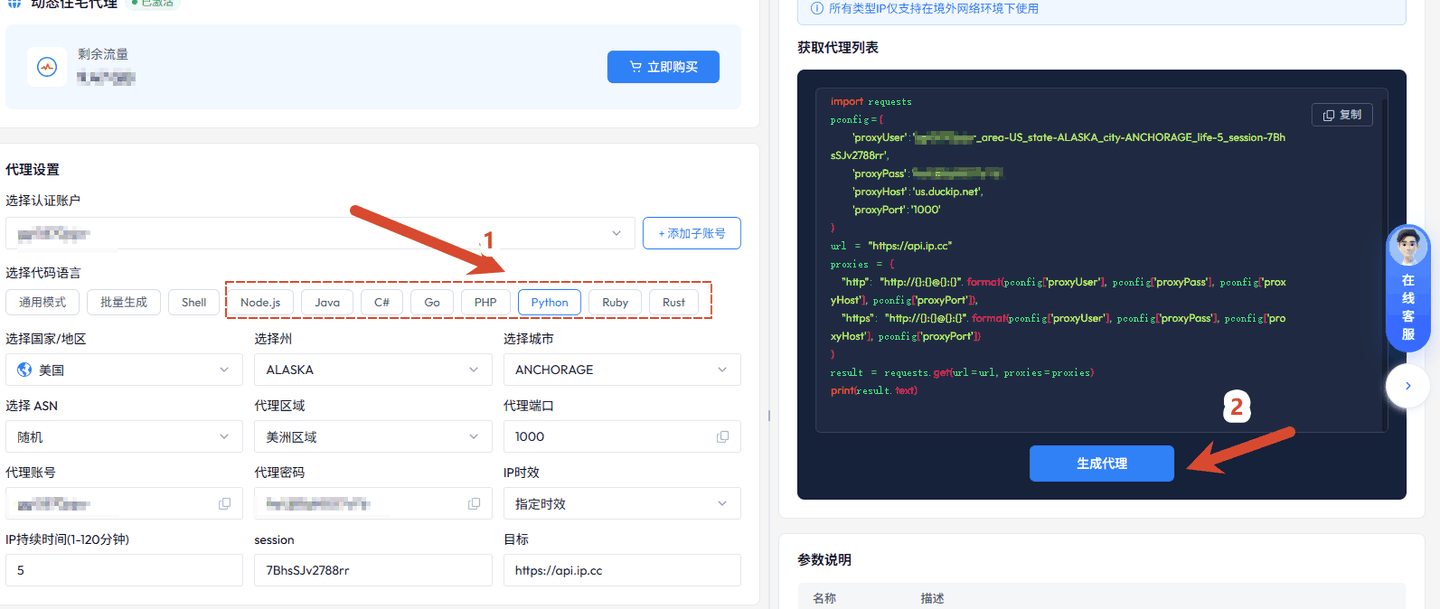
Look at the left "Specify the time limit" and the session section session column in the result. Fill in a fixed value yourself. The same session multiplexes the same egress IP within the time limit. The code language only affects the writing of the example on the right, and the parameters and the result itself are unchanged.
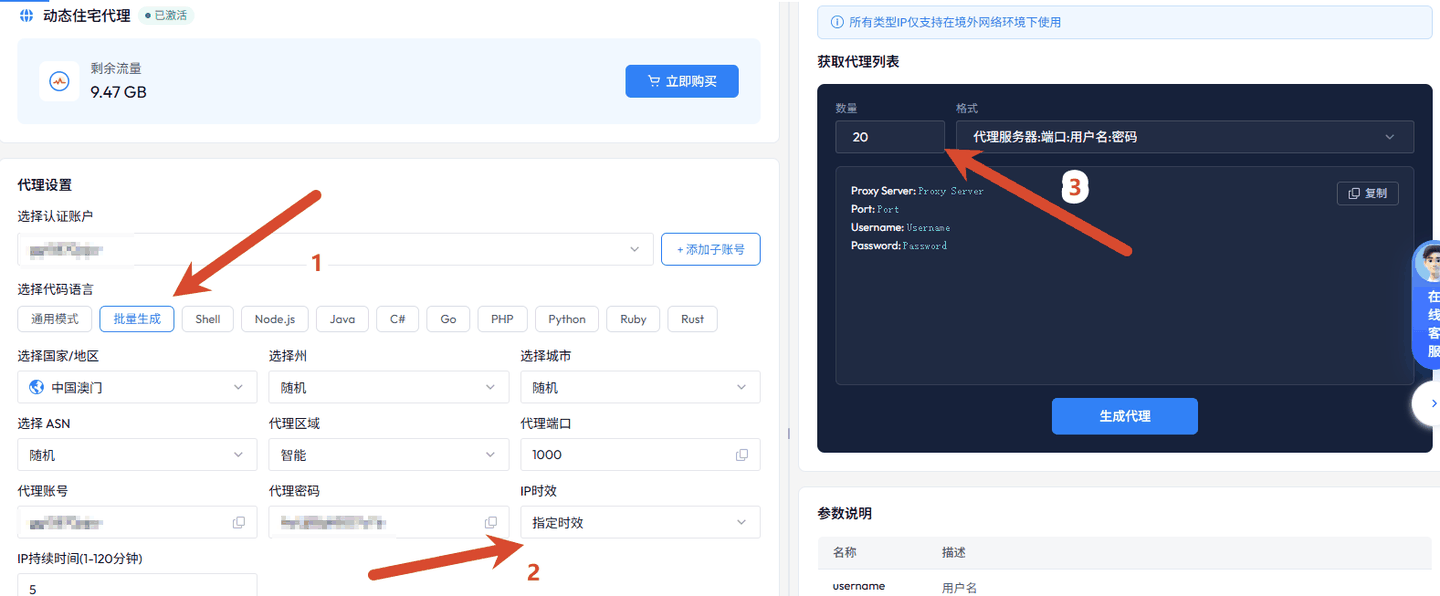
Look at "Quantity" and "Format" and set "Quantity" to the required number of bars (example 20) and select "Format" to output multiple different results at one time, which can be pasted into the antidetect browser or proxy pool as a whole
Step 3: Static Residential Proxy · Traffic Mode Extraction
Static proxies are only account secrets and do not need to be whitelisted; the assigned IP will not be automatically replaced, which is suitable for accounts that require long-term stable status.
- Into Static Residential Proxy - Traffic
- Interface Location: "Static Proxy → Static Residential Proxy - Traffic" on the left
- How it works: Under the “Proxy → username/password authentication” tab.
- Expected results: The page shows "Activated", the number of IPs available, and the remaining traffic.
- Select Authentication Account and Code Language
- Interface position: "Proxy settings" area
- How it works: Select a sub-account that matches your static product line; select “Batch Generate” if you need more than one.
- Expected result: The result area on the right is switched to the corresponding format.
- Choose how to access IP
- Interface position: "Select IP" drop-down box
- How it works: Select “By Region” for quick allocation, or “By Order” for specific IPs that have been purchased.
- Tip: Use "By order" when you need to use a certain number of IPs (for example, corresponding to your account).
- Confirm proxy area/username/password
- Interface Location: "Proxy Area/Proxy Account/Proxy Password" field
- How it works: Keep the default account password to automatically access the sub-account.
- Expected result: The host in the result is a static proxy private domain name, and the port is a static port (example
as.duckip.net:2000).
- Select result format and generate
- Interface position: right "Format" drop-down box + "Generate proxy"
- How it works: Select "Proxy: Port: Username: Password" and click "Generate Proxy" and copy.
- Expected result: The result is a set of static proxy entries line by line.
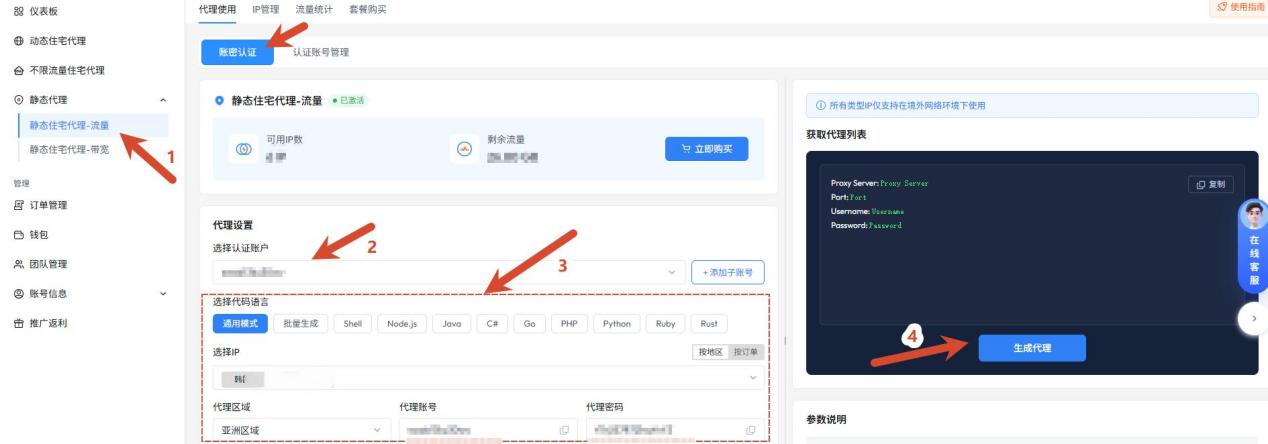
Look at the left navigation and the four operation marks Go to "Static residential proxy - Traffic"→ Select the authentication account → Select the code language to → generate the proxy; "Select IP" Support unlimited/by region/by order
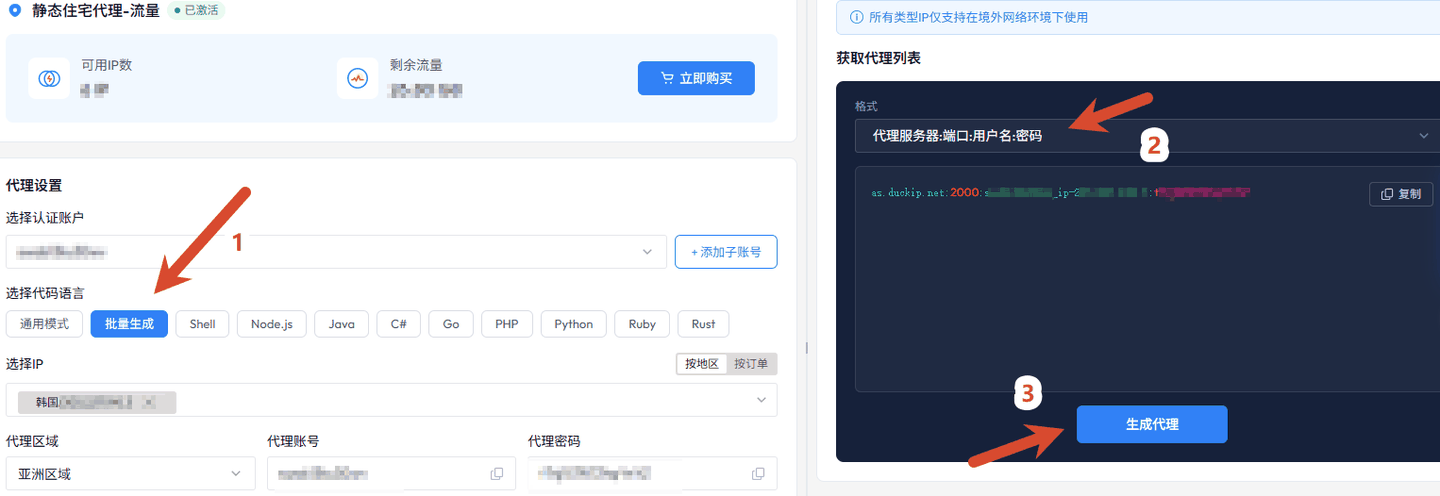
See "Batch generation" and "Format" static proxies are assigned according to the purchased IP, and the egress IP will not be automatically replaced
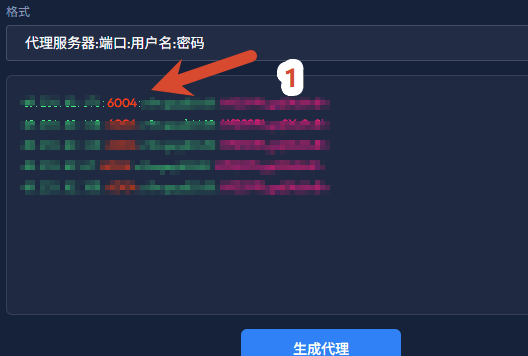
See the "Format" drop-down box and the result box below. Press "Proxy Server: Port: Username: Password" to copy and distribute the entire section.
Static proxy port is not 1000 The static proxy example host is as.duckip.net, port 2000; the dynamic residential proxy example is us.duckip.net:1000. Always rely on dashboard-generated results and do not apply document examples.
Step 4: Static Residential Proxy · Bandwidth Mode Extraction
Bandwidth mode limits bandwidth instead of traffic, billing according to IP, unlimited traffic, suitable for continuous connection and high concurrency scenarios; also only username/password authentication, no whitelist required.
- Enters Static Residential Proxy - Bandwidth
- Interface Location: "Static Proxy → Static Residential Proxy - Bandwidth" on the left
- How it works: Switch to the 'Proxy use' tab.
- Expected results: The page is labeled "Proxy use/IP management/plan purchase" and the card shows the number of IP available.
- Maintain sub-accounts (if needed)
- Interface location: Authentication Account Management portal
- How it works: Assign separate sub-accounts and limits for different businesses.
- Expected results: The sub-account status is enabled and the product type is the bandwidth product line. 3.Select account/IP/region and generate
- Interface position: "Proxy settings" area + "Generate proxy"
- How to operate: Select the authentication account and the IP to be used, confirm the area and port, and generate and copy the results.
- Expected result: The host and port in the result are consistent with the purchase record and can be connected normally.
- Perform a bandwidth verification (optional)
- Interface position: Native terminal
- How to operate: Do a continuous download or speed test on the target site to confirm that the bandwidth meets the procurement plan tier.
- Expected results: Sustained connectivity without frequent interruptions.
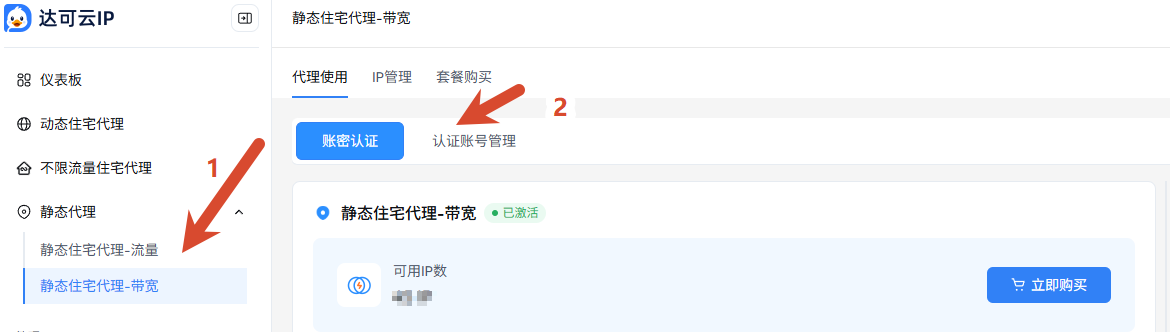
Look at the left navigation and the "Authentication Account Management" portal to enter "Static Residential Proxy - Bandwidth", which can maintain authentication accounts for different businesses; the tab is for proxies to use/IP management/plan purchase
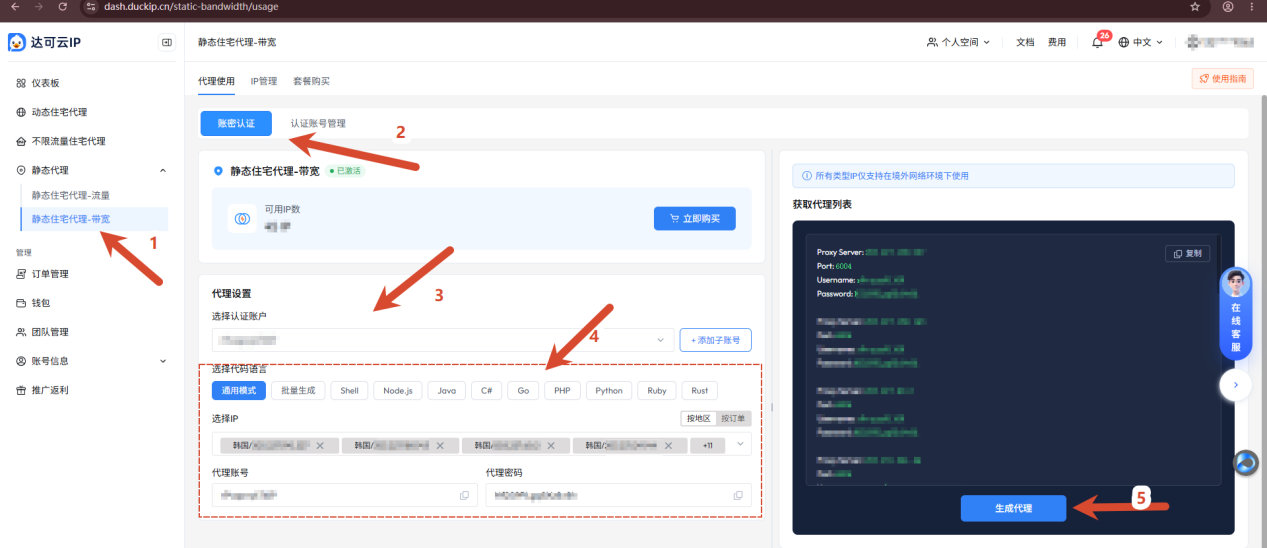
Look at the linkage between the "Authentication account" "Code language" on the left and the "Proxy settings" on the left and the result area on the right, and the extraction method is exactly the same as the traffic mode; the product name is "Unlimited residential proxy", and the plan is selected according to the bandwidth specifications (the authentication account name in the example is encoded)
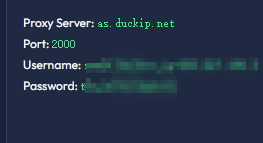
Look at the host and port two lines (username/password encoded) Host example as.duckip.net, port 2000; username and password belong to account credentials (coded in the figure), the actual value is subject to the result generated by the dashboard
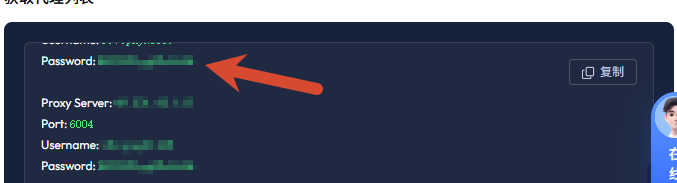
Look at the host and port in the results. Multiple results are output in the selected format and can be pasted directly into the proxy manager.
Step 5: Unlimited Residential Proxy Extraction
Unlimited Residential Proxy is a combination of bandwidth + concurrency + billing cycle: unlimited traffic, available bandwidth and concurrency are determined by the purchased plan tier and billed according to the selected time period. It also supports username/password authentication and API extraction, and the operation steps are exactly the same as dynamic residential proxies.
| Dimension | Description |
|---|---|
| Traffic | No upper limit, use by cycle, suitable for long-cycle, large-scale access |
| Bandwidth | Depends on the plan tier purchased and directly determines the single-thread/overall download speed |
| Concurrent | Determines how many connections/threads can be maintained at the same time, depending on the plan tier purchased |
| Billing Cycle | Billing by Time Period (Purchase page is priced in time units such as "Hours/Day", optional period is based on the purchase page); renewal is required when the period expires |
| Authentication method | username/password authentication and API extraction are supported; API extraction needs to be whitelisted first |
| Difference from dynamic residential proxies | Dynamic dwellings are billed by flow, until used up; unlimited capacity is provided by the combination of "bandwidth + concurrency", and there is no additional billing for traffic |
- Access to unlimited residential proxies
- Interface location: "Unlimited residential → proxy use" on the left
- How it works: Select the 'Account pin authentication' tab (or 'API extraction', see next chapter).
- Expected results: Card shows activated, available bandwidth/concurrency and billing cycle expiration time.
- Configure parameters in ten steps of a dynamic dwelling
- Interface position: "Proxy settings" area
- How it works: Select an authentication account, output format, region, IP lifetime, and session, then generate the proxy.
- Tip:
lifeand session are used in the same way as dynamic residential proxies under unlimited products; capacity bottlenecks are in bandwidth and concurrent plan tier, not traffic. Please confirm if the selected Billing Cycle can cover the business duration before purchasing.
- Generate and record
- Interface position: right result area
- How it works: Copy the results and register them in the ledger as per the environment.
- Expected results: Proxy entries are unique and distinguishable for each environment.
Step 6: Verify that the extraction results are available
After copying the results, first do a minimum verification at the terminal, and then configure it to the business end. This step separates the Proxy Problem from the Client Problem in advance.
# 1) Look at the direct exit of the machine first (not proxied)
curl -s -m 15 api.ip.cc

# 2) Then use the proxy just generated to access the same address and compare whether the country/city has changed
curl -sS -m 25 -x "http://subaccount:subaccount_password@us.duckip.net:1000" https://api.ip.cc

# 3) Only look at status codes and response times (do not print the body; HTTP:000 indicates the proxy did not connect)
curl -s -o /dev/null -w "HTTP:%{http_code} time:%{time_total}s\n" -m 25 -x "http://subaccount:subaccount_password@us.duckip.net:1000" https://api.ip.cc| Command Output | Conclusion | Next Step |
|---|---|---|
| Step 1 Failed | Abnormal Pre-network Environment | Resolve the network access issue first, then return to the extraction step. |
| Step 2 failed but Step 1 succeeded | There is a problem with the proxy credentials/parameters/protocol | Check the four pieces of information and try each of HTTP and SOCKS5 once. |
| Step 2: The country does not match expectations | Regional parameters are incorrect | Re-generate a new proxy after re-selecting the country/state/city. |
| All three steps were successful, but the client failed | The problem is in the client configuration | Check whether it was saved, whether the environment was restarted, and whether there are any direct connection rules. |
About Local DNS and SOCKS5 If using the SOCKS5 protocol, some proxy tools by default resolve domain names locally; in a fake-IP / split-routing environment, it is easy to get incorrect addresses. When troubleshooting connection issues, you can first switch to the HTTP protocol, or have the client use remote resolution (e.g., socks5h://) and then compare the results.
Step 7: Deliver the results to the target end
Different target endpoints require different fields, just fill them in according to the following comparison table; the complete configuration steps for the antidetect browser can be found in the 'antidetect browser' category.
| Target End | Fill In | Corresponding Document |
|---|---|---|
| antidetect browser (AdsPower / Bit / Hubstudio / Dolphin, etc.) | Host, port, username, password four sections; it is recommended to have an independent session for each environment | Overview and Connectivity Check |
| Mobile App / Emulator | Use 'Universal Mode' to extract, fill in address, port, account, and password item by item | Other browsers and extensions solutions |
| Self-developed program / crawler | Use 'API extraction' to get the IP list, or directly write the username and password into the proxy configuration | API extraction and code integration |
| Scenarios that require cache acceleration | Enable cache proxy and install certificate, using HTTP protocol only | Cache Proxy |
Related Documents Proxy Usage Instructions (Command Line / Code / Client Integration) | Quick Troubleshooting Guide