
AdsPower Setup
Category: antidetect browser | Updated Date: 2026-09-14
AdsPower Five Steps: Prepare four pieces of information → Create a new environment → Fill in the proxy and check → Configure fingerprint → Open the environment for verification.
On this page:
- Preparation: First, have the four pieces of information ready
- Step 1: Create a new browser environment
- Step 2: Fill in the proxy information and check
- Step 3: Add proxies in bulk (preferred when there are many environments)
- Step 4: Fingerprint Configuration (Maintain Consistency)
- Step 5: Open the environment and verify the IP location
- AdsPower Frequently Asked Questions
The configuration of AdsPower can be summarized as 'fill in once, use in two places': first, prepare four pieces of information and fill them in once in the environment; when there are multiple environments, switch to using proxy management for batch import.
① Prepare four pieces of information → ② Create a new browser environment → ③ Fill in the proxy and check → ④ Fingerprint Configuration → ⑤ Open the environment to check the IP
Preparations: First, have the four pieces of information ready
One per environment, generate them all at once in the dashboard using 'username/password authentication → Batch Generation' to avoid configuring and retrieving one by one.
| Field | Where it comes from in the dashboard | Example |
|---|---|---|
| Host / Proxy Server | Hostname in Generated Result | us.duckip.net (for example only, refer to the dashboard result for actual) |
| Port | Port in generated result | 1000 |
| Account (Username) | Sub-account Region / Validity / Session Parameters | Sub-account_area-US_state-ALASKA_life-60_session-ap01 |
| Password | Sub-account Password | (Set in the Authentication Account Management) |
Example host is not a fixed value
us.duckip.net:1000(dynamic residential proxy) andas.duckip.net:2000(static residential proxy) are documentation examples. Host prefixes vary by region and product. Always use the host and port copied from your dashboard.
Why does each environment need a separate session The same session will reuse the same IP within its validity period. Sharing one session across multiple environments is equivalent to multiple accounts sharing one egress IP, which is highly likely to be identified as linked; while not using a session at all will cause the egress IP to change frequently. Recommendation: number of environments = number of sessions.
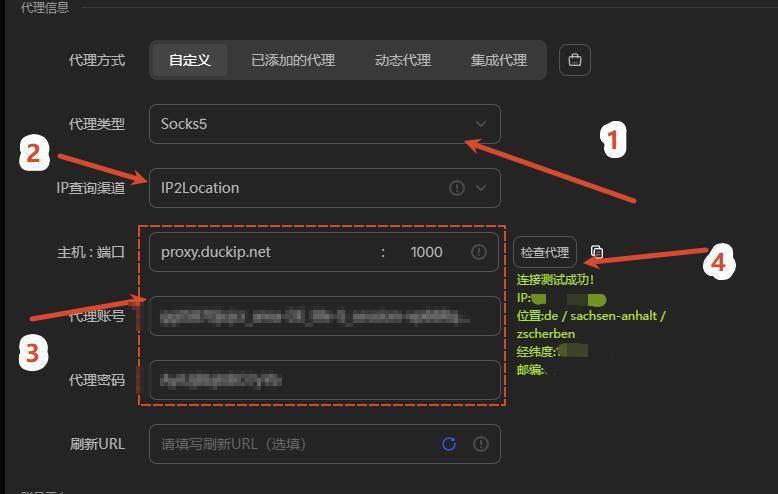
Check the 'Connection Test Successful' prompt and the exit country. The example is a SOCKS5 proxy. After clicking 'Check Proxy,' it returns 'Connection Test Successful,' and the exit location is Germany.
Step 1: Create a new browser environment
- Open AdsPower and log in
- Interface Location: Client Main Interface
- How to operate: Start the client, log in, and then enter environment management.
- Expected Result: Able to see the existing environment list and the 'New Browser' button.
- Click 'New Browser'
- Interface Position: Main button at the top left corner
- How to operate: Click to enter the "Create New Browser Environment" page, with tabs: Basic Settings / Proxy Information / Account Platform / Fingerprint Configuration / Advanced Settings.
- Expected Result: The form switches to the basic settings page.
- Fill in the basic settings
- Interface Location: "Basic Settings" tab
- How to operate: Select the browser and operating system according to the target market; the User-Proxy can remain automatically generated; write the session used in this environment in the remarks.
- Fill in the content: Name (including region and purpose, such as
US-ALASKA-Store01), browser, operating system, User-Proxy, group, remarks.
- Expected Result: No red validation prompts in any fields.
- (Optional) Import Cookies
- Interface Location: "Basic Settings → Cookie"
- How to operate: Import if already logged in; skip for new accounts.
- Tip: Do not use the same batch of cookies to initialize multiple environments, as this may cause account linkage.
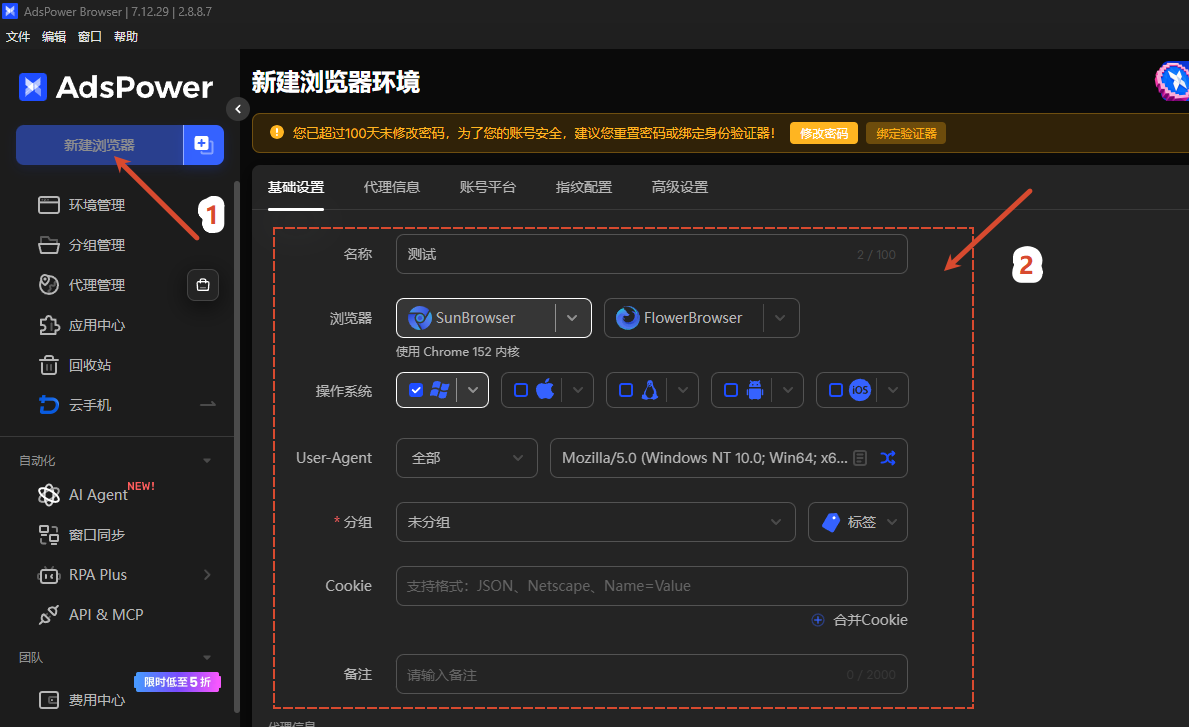
Look at the red markings 1–2 and the five tags on the left. Click 'New Browser' → Fill in the name, browser, operating system, User-Proxy, group, Cookie, and remarks in 'Basic Settings'
Step 2: Fill in Proxy Information and Check
- Switch to the 'Proxy Information' tab
- Interface Location: The second tab on the New / Edit Environment page
- How to operate: Choose the proxy mode as 'Custom Proxy'.
- Expected result: Fields such as proxy type, host, port, username, and password appear.
- Choose the type of proxy
- Interface Location: 'Proxy Type' dropdown
- How to operate: First select HTTP to complete a successful test, then switch to SOCKS5 as needed.
- Expected Result: The dropdown box displays the selected protocol.
- Tip: If domain name resolution errors occur under SOCKS5, fall back to HTTP first.
- Fill in the host, port, username, and password
- Interface Location: The four fields «Proxy Host / Proxy Port / Proxy Account / Proxy Password»
- How to operate: Copy and paste from the dashboard, do not type manually.
- Fill in the content: Enter the host and port with the value "copied" from the dashboard (example
us.duckip.net:1000), the account as the full username (do not remove any parts of the parameter section), and the password as the sub-account password.
- Expected Result: No extra spaces in the field; the username starts with the sub-account name.
- Click 'Check Proxy'
- Interface Location: Detection button in the proxy information area
- How to operate: Wait for the result.
- Expected Result: A success message appears (such as "Connection Test Successful") and the destination country/city is displayed. In case of failure, refer to the FAQ on this page.
- Protect the environment
- Interface Location: Save button at the bottom of the page
- How to operate: After saving, return to the environment list and confirm that the environment has appeared.
- Expected Result: The list shows the new environment and its proxy information.
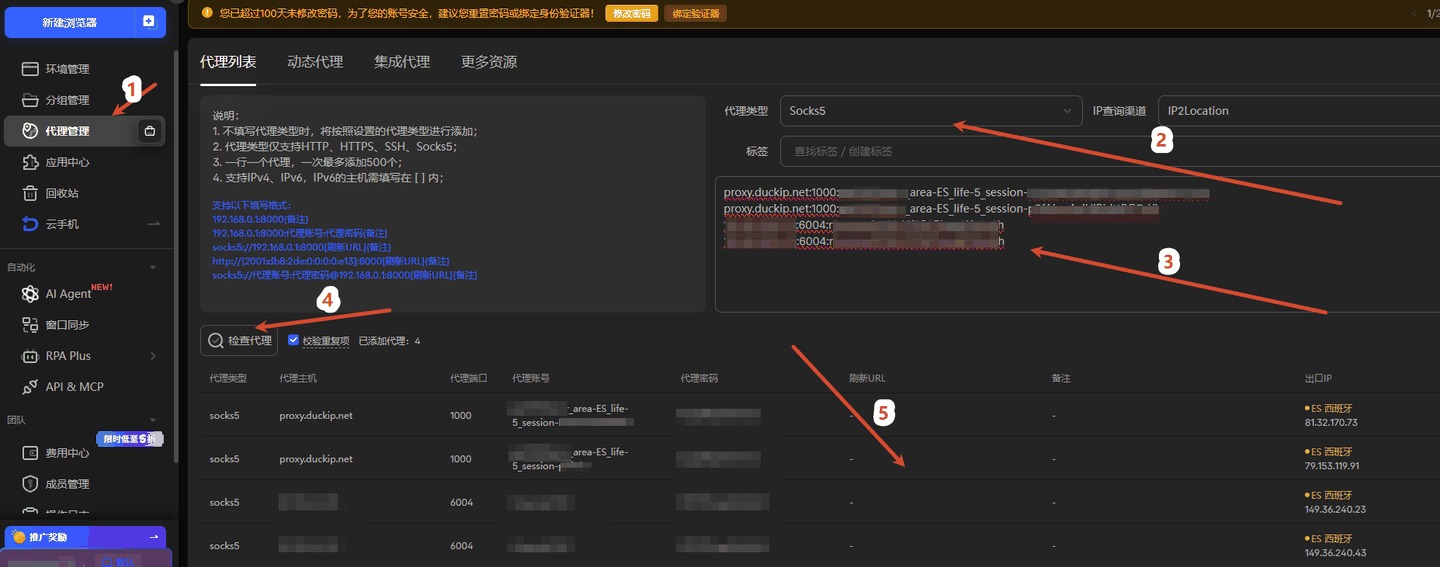
Look at the header fields and the 'Check Proxy' button. In 'Proxy Management,' proxies can be maintained in bulk. Four examples have been added, and channels can be filtered by proxy type and IP for individual checks.
Step 3: Add Proxies in Bulk (Preferred When There Are Many Environments)
- Copy the batch generation results from the dashboard
- Interface Location: Dashboard 'username/password authentication → Batch Generation' result box
- How to operate: Click 'Copy', one proxy per line.
- Expected Result: The number of copied text lines equals the number of environments.
- Go to 'Proxy Management' and import in bulk
- Interface Location: AdsPower left side 'Proxy Management'
- How to operate: Select batch add / import, and paste in the format
ProxyServer:Port:Username:Password.
- Expected Result: The list displays new proxy entries consistent with the number of pasted lines.
- Assign a proxy to each environment
- Interface Location: Environment List → Edit Environment → Proxy Information → "Select Existing Proxy"
- How to operate: Assign the N-th proxy to the N-th environment and record the corresponding relationship in the notes.
- Expected result: The usernames (session segments) of any two environments are not the same.
us.duckip.net:1000:subaccount_area-US_state-ALASKA_city-ANCHORAGE_life-60_session-ap01:subaccount_password
us.duckip.net:1000:subaccount_area-DE_state-BAVARIA_city-NUREMBERG_life-60_session-de02:subaccount_password
us.duckip.net:1000:subaccount_area-GB_life-60_session-uk03:subaccount_password
Step 4: Fingerprint Configuration (Maintain Consistency)
The environment camouflage settings can be referenced according to the illustration, the core principle is "consistent with the proxy exit country".
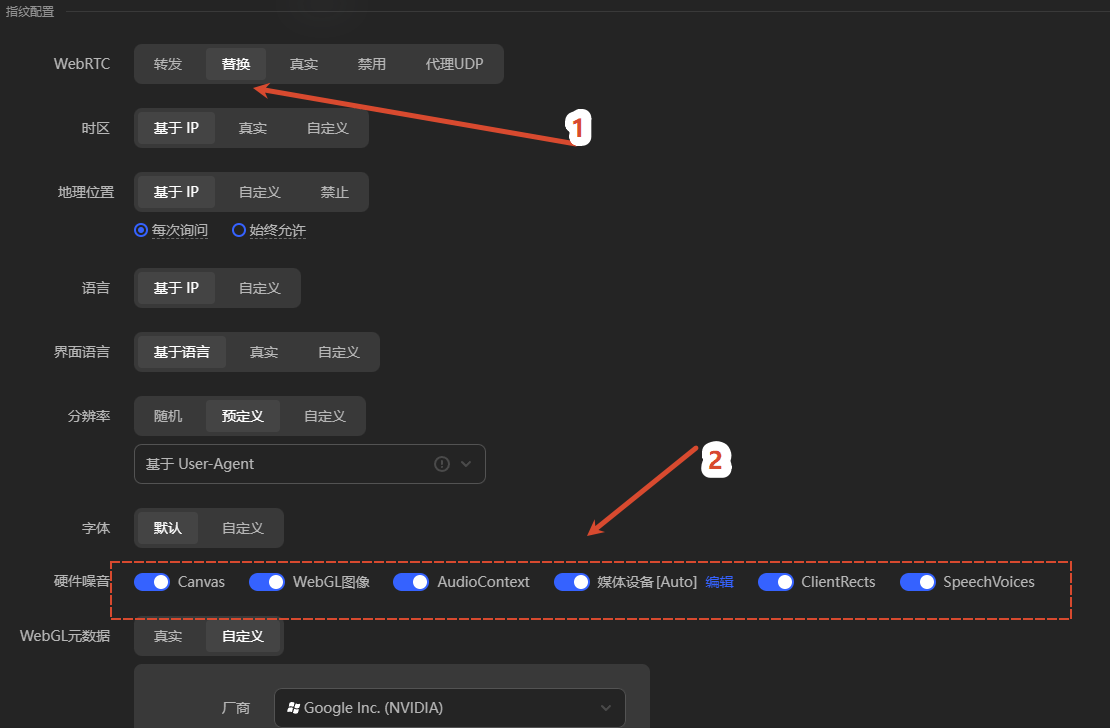
Check time zone, location, and WebRTC. The time zone, location, language, etc., should be consistent with the proxy's location; it is recommended to forward or disable WebRTC.
| Configuration Item | Recommendation | Reason |
|---|---|---|
| Time Zone | Follow the country where the proxy is located | The environment IP is in Germany, the system time zone is Asia, which is the most typical abnormal combination. |
| Location | Based on IP | Do not manually write a city that does not match the proxy. |
| Language / Interface Language | Consistent with the target market | For example, a U.S. account uses en-US. |
| WebRTC | Forward / Disable | Prevent real internal IP leakage. |
| Resolution / Font / Hardware Noise | Random or follow the system | Do not make the same batch environment completely identical. |
| WebGL / Canvas | Random or predefined | Make each environment's graphics fingerprint unique. |
Step 5: Open the environment and verify the IP location
- Click 'Open' to start the environment
- Interface Location: The "Open" column in the environment list
- How to operate: Wait for the browser window to finish launching.
- Expected Result: The window title is the environment name, and the page is a clean new environment.
- Visit the inspection site to verify the export
- Interface Location: Newly opened browser window
- How to operate: Visit
api.ip.ccoripinfo.io, and compare country / city / ASN.
- How to operate: Visit
- Expected Result: The egress country matches the region set in the environment, and the ASN is of residential type.
- (Optional) Perform a fingerprint self-check
- Interface location: Sites like BrowserScan / BrowserLeaks
- How to operate: Check whether the time zone, language, WebRTC, Canvas, etc., are consistent with the proxy country.
- Expected Result: No alerts of the type 'Time Zone and IP Mismatch'.
- Record in the ledger
- Interface Location: Team Ledger
- How to operate: Register the environment name, session, region, bound account, and status.
- Expected Result: Subsequent troubleshooting can be directly located through the ledger.
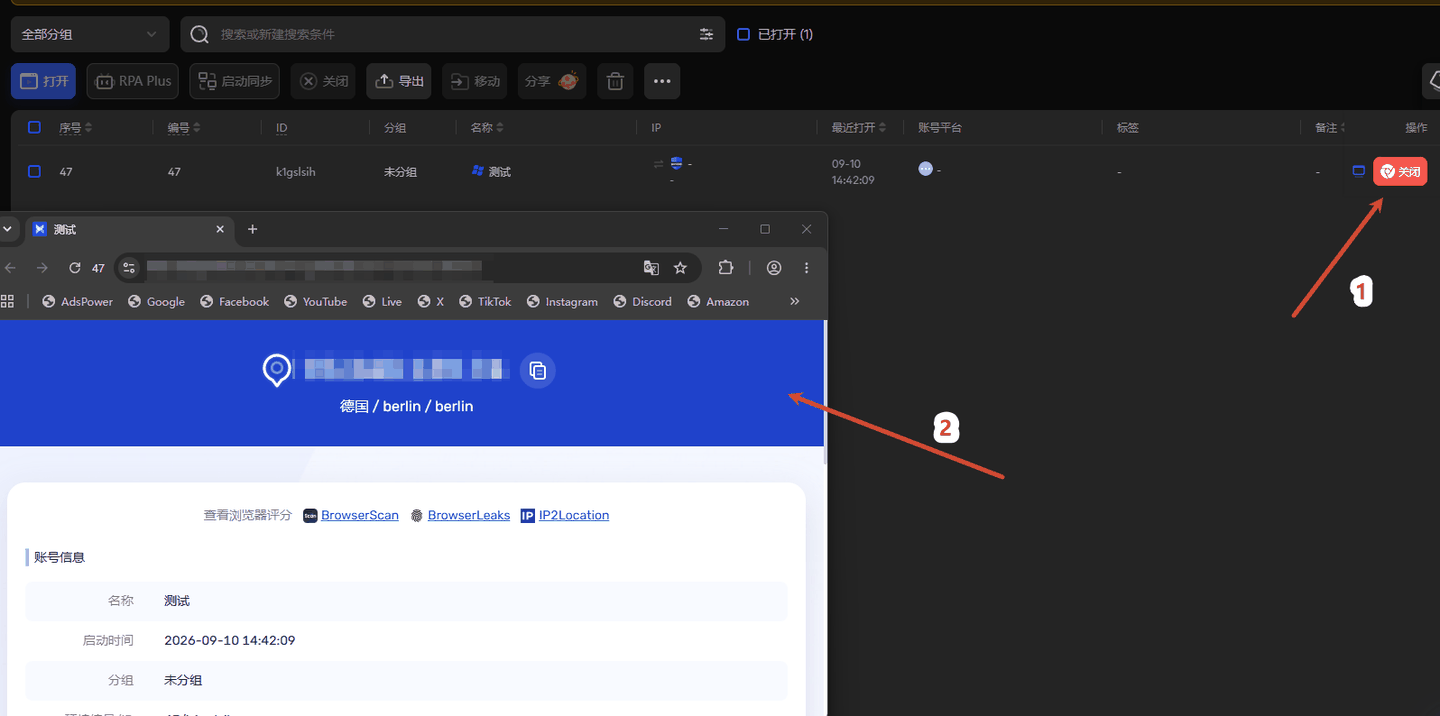
Look at the country/city indicated by the red mark 2. The environment export shows Germany / Berlin; confirm it is correct before proceeding with account operations.
AdsPower Frequently Asked Questions
| Phenomenon | Cause | Resolution |
|---|---|---|
| 'Check Proxy' keeps failing | The account or password contains concatenated parameters that are truncated, wrong protocol selection, abnormal upstream network environment | Follow step 1 to copy all four pieces of information again; try changing to HTTP first, then try SOCKS5. |
| After opening the environment, the IP didn't change | The proxy was not saved successfully, or the environment is still using the old proxy | Confirm that it has been saved on the environment's proxy information page, and restart the environment. |
| Multiple environments have the same IP | The same session was reused during batch generation | Generate a new batch of unique sessions and reassign them. |
| Environment Prompt: IP Change | Residential IPs are reassigned after expiration | This is normal; increase life (up to 120 minutes) or switch to a static residential proxy. |
| The same account logged in on multiple environments | Cookies are merged or the same proxy is used | Keep separate environments and separate sessions for each account, do not merge cookies. |
Related Documents Overview & Connectivity Check | Account Credential Extraction | API Extraction & Code Integration