
API Extraction and Code Integration
Category: Proxy Extraction | Updated: 2026-09-14
Complete API integration in five steps: whitelist → parameters → link → code/client → operations and maintenance, with each step including interface locations and checkpoints.
On this page:
- Step 1: Add to the whitelist (a mandatory prerequisite for API extraction)
- Step 2: Set extraction parameters and generate the link
- Step 3: Use code to call the extraction API
- Step 4: Connect the API extraction to the antidetect browser
- Step 5: Safety and Operations Recommendations
API extraction uses an app_key and an IP whitelist instead of sub-accounts. It is suitable for custom applications and antidetect browsers that support API extraction. This guide covers five steps: whitelist, parameters, code, client setup, and operations. Each step includes the dashboard location and an expected result.
① Add a whitelist → ② Set extraction parameters → ③ Generate link → (4) Program / client access → ⑤ Verification and Operations & Maintenance
Two prerequisites
- Network: requests must pass through an upstream node outside mainland China. 2. Whitelist: add that node's egress IP to the whitelist, or authentication will fail and the API may return an empty result.
Step 1: Add to the whitelist (a mandatory prerequisite for API extraction)
- Enter whitelist management
- Interface Location: Dynamic Residential Proxy → Proxy Usage → Whitelist Management
- How to operate: Click the 'Whitelist Management' tab.
- Expected Result: The page displays the 'Local IP', the 'Add to Whitelist' button, and the list of already added items, along with a prompt indicating the maximum number of entries that can be added.
- Confirm the actual egress IP of the upstream node
- Interface Location: "Local IP" or local terminal on the page
- How to operate: Execute
curl -s api.ip.ccon the machine/environment that actually initiates the request, and record the returned IP and country.
- Expected Result: The returned IP is the actual egress IP to add. If traffic passes through an upstream proxy, it may differ from the page's Local IP value; use the command result.
- Add the IP to the whitelist
- Interface Location: "Add to Whitelist" button, or the input box below "Add"
- How to operate: Add with one click, or manually fill in the IP and then click "Add"; it is recommended to note the purpose and date in the remarks for easier cleanup later.
- Expected Result: The list shows the IP, with the correct added time and remarks.
- Review Whitelist
- Interface Location: Whitelist list (IP address / Addition time / Notes / Actions)
- How to operate: Confirm that there are no extra entries; promptly delete entries that are no longer in use.
- Note: The whitelist can include up to 10 IPs. Please register the purpose for each upstream node individually.
# Confirm the actual egress country/region and IP (used to verify the whitelist entry)
curl -s -m 15 api.ip.cc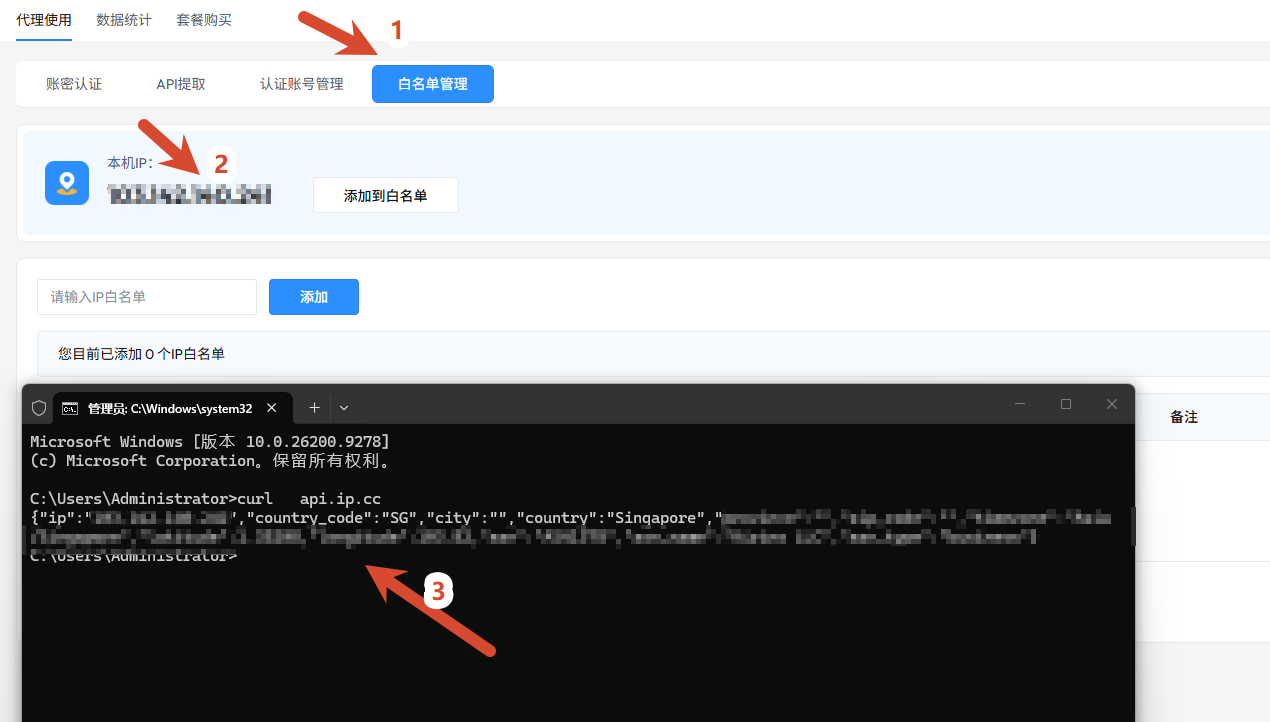
Follow callouts 1–3: open Whitelist Management, check the local IP, then confirm the actual egress IP from the command line. The example returns SG (Singapore).
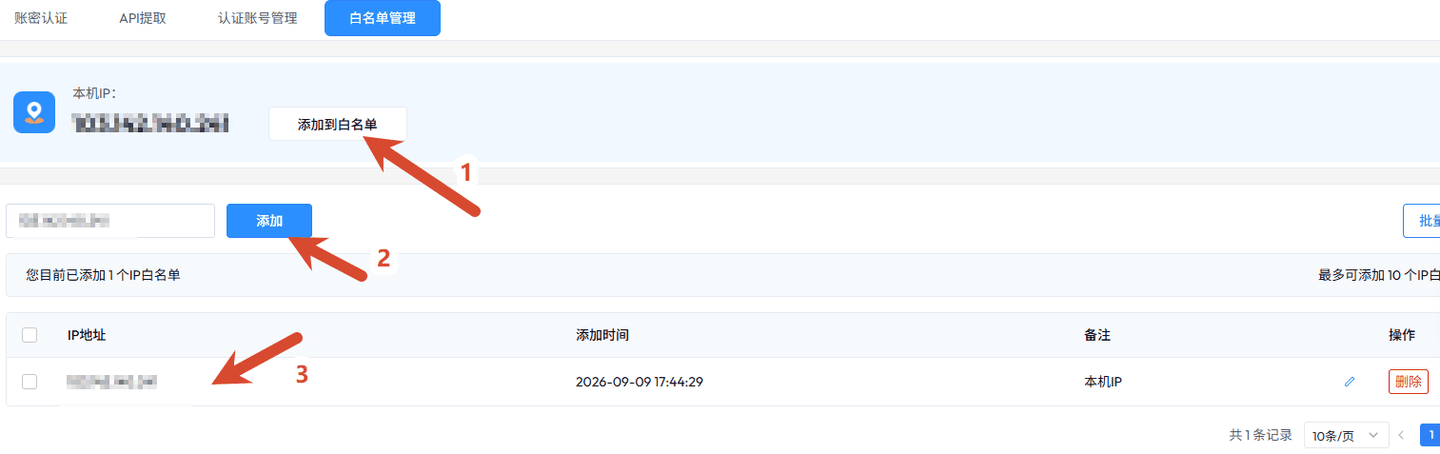
See the prompt 'Up to 10 IPs can be added to the whitelist.' Click 'Add to Whitelist' with one click, or fill in manually and then click 'Add'; the page will show the number added and the limit.
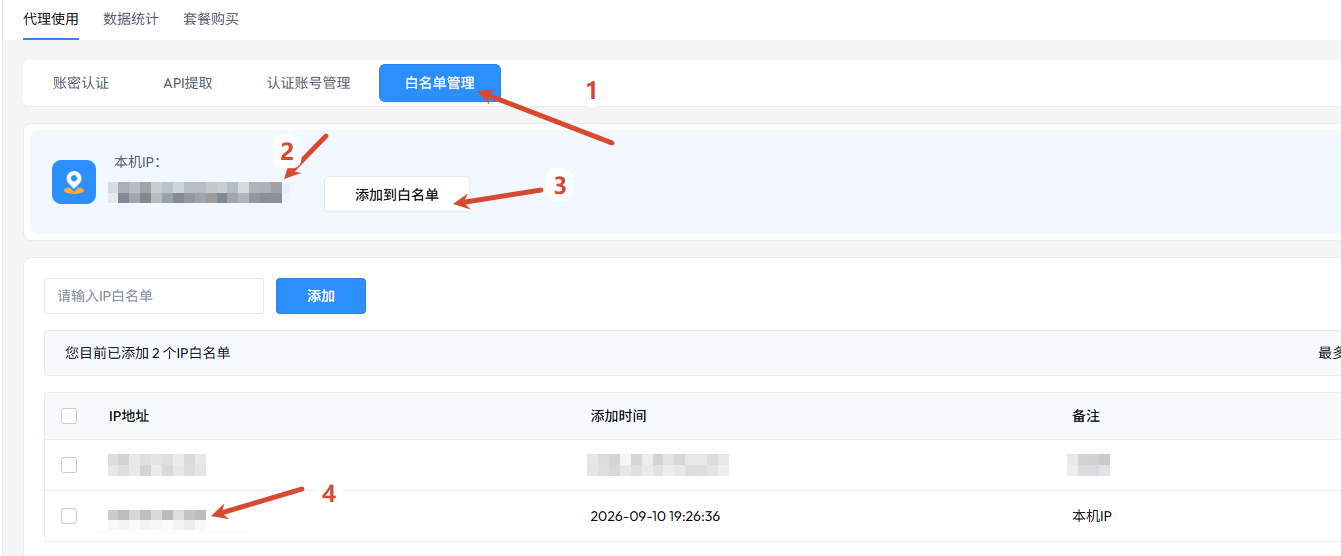
Check the 'Remarks' and 'Added Time' columns. In the example, 2 IP whitelists have been added, one of which has a remark 'Local IP', and can be edited or deleted.
The upstream IP will change, and the whitelist must be updated accordingly If your overseas proxy is a dynamic IP (home broadband with periodic reset, dynamic exit nodes, mobile network), the API extraction will immediately fail after the egress IP changes. Recommendations: ① Bind a fixed egress IP to the proxy node; ② Or switch to username/password authentication to avoid relying on a whitelist.
Step 2: Set Extraction Parameters and Generate Link
- Switch to the 'API Extraction' tab
- Interface Location: Dynamic Residential Proxy → Proxy Usage → API Extraction
- How to operate: Click the tab, and the page will retain the previous parameter settings.
- Expected Result: The tag is highlighted, and an API link area appears on the right.
- Set extraction quantity
- Interface Location: "Extraction Quantity" input box
- How to operate: When using a self-built program, fill in according to concurrency needs (up to 500); when configuring to the antidetect browser, you must fill in 1.
- Expected Result: The
num=in the result link matches the entered value.
- Select Country / State / City
- Interface Location: Dropdown boxes for "Select Country/Region / Select State / Select City"
- How to operate: Select step by step according to the target business area; keep random / global mix when no targeting is needed.
- Expected Result: The
cc/state/cityin the link matches the selection.
- Set the IP lifetime
- Interface position: "IP Lifetime" drop-down box
- How to operate: Choose 1–120 minutes. Short lifetimes suit rotating collection tasks, while longer lifetimes suit workflows that need session continuity.
- Expected Result: The
life=in the link matches the specified duration.
- Expected Result: The
- Choose Data Formats and Protocols
- Interface Location: The drop-down menus for 'Data Format' and 'Proxy Protocol'
- How to operate: Use
jsonfor application parsing andtxtfor command-line or simple script use. Only HTTP and SOCKS5 are supported.
- Expected Result: The
format=andprotocol=in the link match the selection.
- Choose delimiter
- Interface Location: "Separator" dropdown
- How to operate: Choose CRLF, LF, CR, or Tab based on how your script parses multiple results.
- Tip: If multiple results appear on one line, make sure the selected delimiter matches your parser.
- Click 'Generate Link' and copy
- Interface Location: The right-side "API Link" area
- How to operate: Click 'Generate Link' → Click 'Copy'; you can also click 'Open Link' to preview the returned content in the browser.
- Expected Result: Opening the link in a browser should show a list of IPs and ports (txt is multi-line, json is structured data).
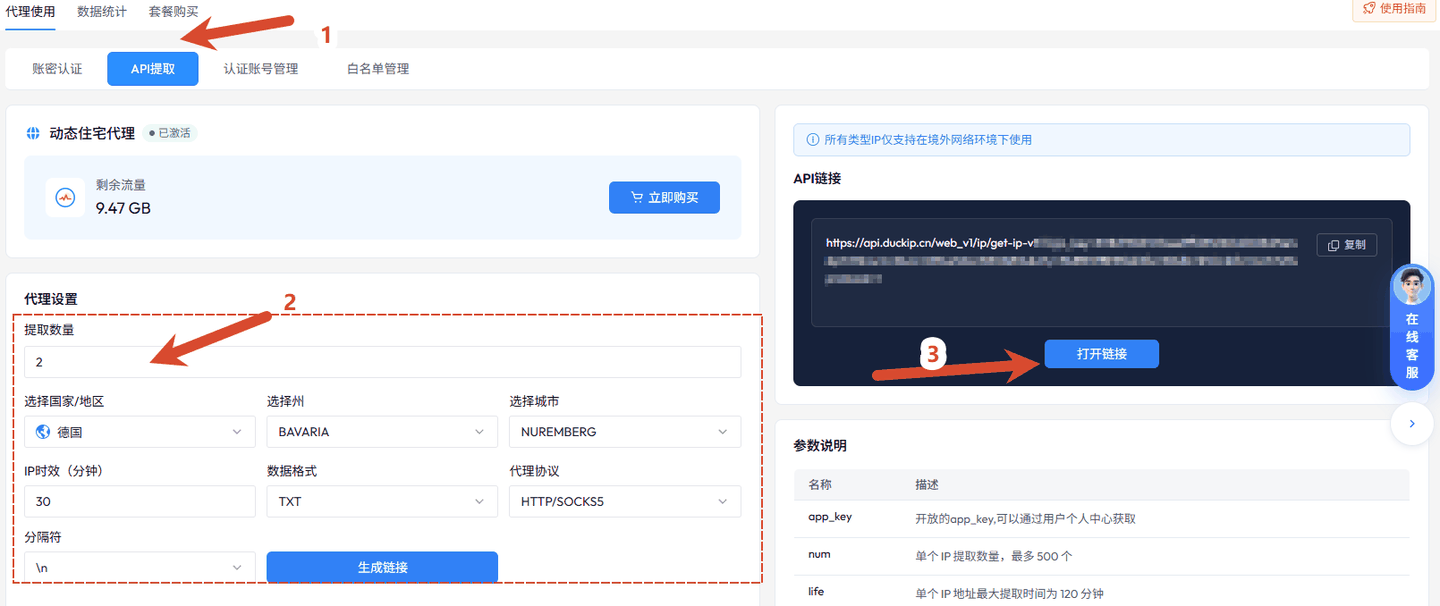
Look at the corresponding relationship between the left and right columns: the left side sets parameters, and the right side provides API links along with "Copy / Open Link" buttons.
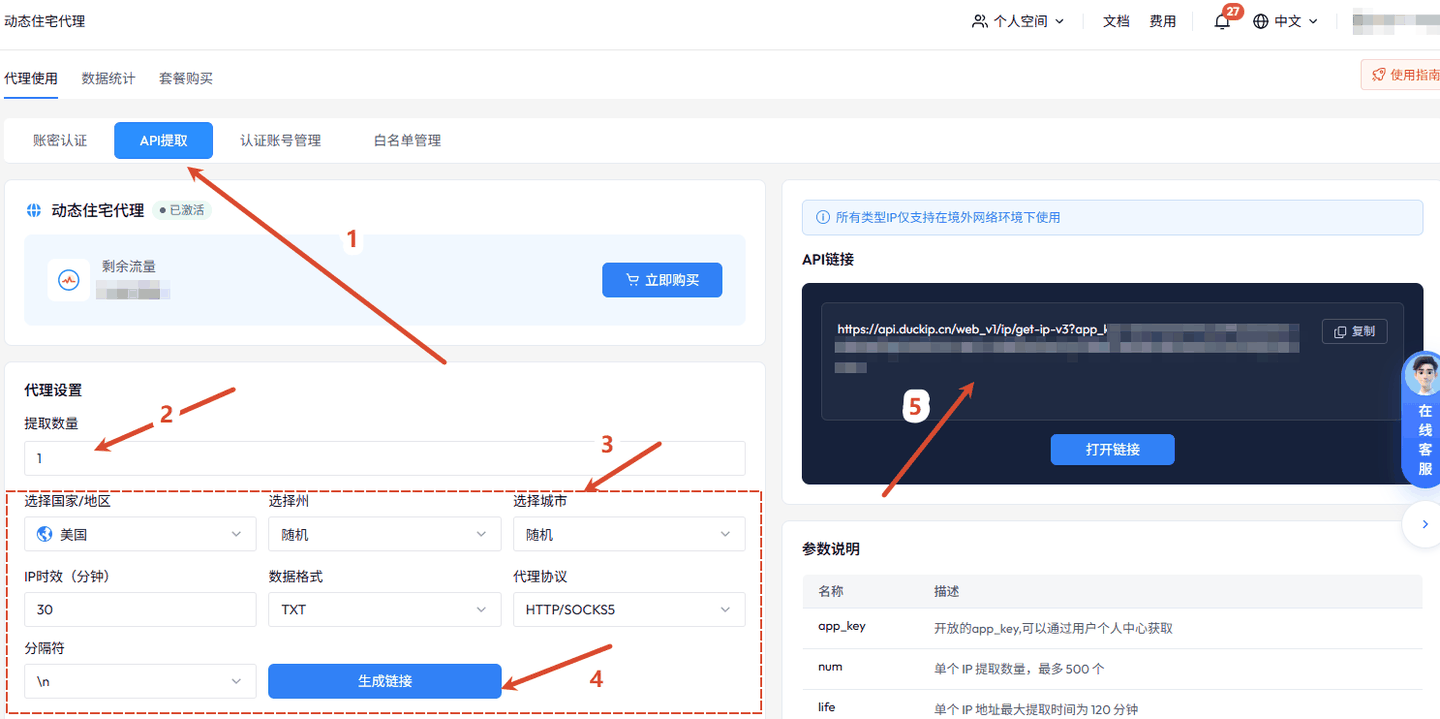
Look at the red marks 1–5 → Enter API extraction → Set extraction quantity → Select country/state/city → Generate link → Copy or open link

Click the link or the 'Copy / Open Link' button to directly open the preview results in the browser, or copy it to a program or antidetect browser for use
| Parameter | Meaning | Suggested Input |
|---|---|---|
Number to extract / num | Number of IPs returned per request, up to 500 | Batch as needed with a self-built program; must be 1 when configured in the antidetect browser |
| Country / Region / State / City | Geographical targeting range of IP | Granularity can be 'Country', 'Country State', 'Country State City'; select random / global mix when targeting is not required. |
IP Duration / life | Maximum available time for a single IP, 1—120 minutes | Short duration is more suitable for rotational collection; long duration is suitable for tasks that require session continuity. |
Data Format / format | txt or json | Use json for program parsing; use txt for command line or simple scripts. |
Proxy Protocol / protocol | Return result adapted to http and socks5 (only these two) | Choose according to the target end; antidetect browsers usually use socks5 or http; other protocols are not supported. |
Separator / lb | Method of separating multiple results (newline carriage return / newline / carriage return / Tab) | Choose according to script parsing habits to avoid multiple results sticking together into a long string. |
Step-by-step Explanation of Link Structure
https://api.duckip.cn/web_v1/ip/get-ip-v3?app_key=XXXXXX&pt=X&num=2&cc=DE&state=BAVARIA&city=NUREMBERG&life=30&lb=%5Cn&format=txt&protocol=1| Parameter | Description |
|---|---|
app_key | The open application key, which can be obtained from the Dashboard Personal Center / API Extraction page. |
pt | Product type identifier, generated by the dashboard, do not modify manually. |
num | Number of individual IPs to extract, up to 500. |
life | The maximum usable time for a single IP address, up to 120 minutes. |
cc | Country/Region code, for example DE, US, GB. |
state | State/province codes, such as 'BAVARIA', 'ALASKA'. |
city | City code, for example NUREMBERG, ANCHORAGE. |
format | Return data format: txt or json. |
protocol | Proxy protocol: 1 means HTTP and SOCKS5. |
lb | Separator for multiple results: newline carriage return / newline / carriage return / Tab. |
Step 3: Call the extraction API with code
The example below demonstrates the complete loop of 'calling the API to get an IP → using that IP to access the target website.' The differences between languages only exist in the proxy setup part; the logic is the same.
curl -sS "https://api.duckip.cn/web_v1/ip/get-ip-v3?app_key=your_app_key&num=1&cc=DE&state=BAVARIA&city=NUREMBERG&life=30&format=txt&protocol=1&lb=1"

After obtaining the ip:port, use it to access the target site for verification
curl -sS -m 20 -x "http://ip:port" https://api.ip.cc
import requests
API = ("https://api.duckip.cn/web_v1/ip/get-ip-v3"
"?app_key=your_app_key&num=1&cc=DE&state=BAVARIA&city=NUREMBERG"
"&life=30&format=json&protocol=1&lb=1")
resp = requests.get(API, timeout=15)
print(resp.text) # Print first to confirm the actual returned structure
item = resp.json()["data"][0] # Use actual field names as returned
proxy = "http://{}:{}".format(item["ip"], item["port"])
# If the return includes username and password, please combine them as http://user:pass@ip:port
r = requests.get("https://api.ip.cc/",
proxies={"http": proxy, "https": proxy}, timeout=20)
print(r.json())const https = require("https");
const API = "https://api.duckip.cn/web_v1/ip/get-ip-v3?app_key=your_app_key&num=1&cc=DE&life=30&format=json&protocol=1&lb=1";
https.get(API, (res) => {
let body = "";
res.on("data", (chunk) => (body += chunk));
res.on("end", () => {
const data = JSON.parse(body);
console.log(data); // Print and then access the real fields for ip / port
});
}).on("error", console.error);<?php
// Step 1: Call the extraction interface to get a line of ip:port (the caller's IP must be on the whitelist)
$ch = curl_init("https://api.duckip.cn/web_v1/ip/get-ip-v3?app_key=YOUR_APP_KEY&num=1&cc=DE&life=30&format=txt&protocol=1&lb=1");
curl_setopt_array($ch, [CURLOPT_RETURNTRANSFER => true, CURLOPT_TIMEOUT => 20]);
$text = curl_exec($ch);
if ($text === false) {
exit("Extraction failed: " . curl_error($ch));
}
curl_close($ch);
$ipPort = trim(explode("\n", trim($text))[0]); // format: ip:port
echo "Extracted proxy: {$ipPort}\n";
// Step 2: Use the extracted ip:port to access the target site
$ch = curl_init("https://api.ip.cc/");
curl_setopt_array($ch, [
CURLOPT_RETURNTRANSFER => true,
CURLOPT_PROXY => $ipPort,
CURLOPT_PROXYTYPE => CURLPROXY_HTTP,
CURLOPT_TIMEOUT => 20,
]);
$body = curl_exec($ch);
if ($body === false) {
exit("Request failed: " . curl_error($ch));
}
echo curl_getinfo($ch, CURLINFO_HTTP_CODE) . " " . $body . PHP_EOL;
curl_close($ch);package main
import (
"fmt"
"io"
"net/http"
"net/url"
"strings"
)
func main() {
// Copy the entire link from the console; use ASCII characters for app_key to avoid URL parsing errors
api := "https://api.duckip.cn/web_v1/ip/get-ip-v3?app_key=YOUR_APP_KEY&num=1&cc=DE&life=30&format=txt&protocol=1&lb=1"
resp, err := http.Get(api)
if err != nil {
fmt.Println("Extraction failed:", err)
return
}
defer resp.Body.Close()
raw, err := io.ReadAll(resp.Body)
if err != nil {
fmt.Println("Read failed:", err)
return
}
ipPort := strings.TrimSpace(strings.Split(string(raw), "\n")[0]) // format: ip:port
proxyURL, err := url.Parse("http://" + ipPort)
if err != nil {
fmt.Println("Failed to parse proxy address:", err)
return
}
// Use the extracted ip:port as a proxy to access the target site
client := &http.Client{Transport: &http.Transport{Proxy: http.ProxyURL(proxyURL)}}
r, err := client.Get("https://api.ip.cc/")
if err != nil {
fmt.Println("Failed to access through proxy:", err)
return
}
defer r.Body.Close()
body, _ := io.ReadAll(r.Body)
fmt.Println(r.Status, string(body))
}import java.net.InetSocketAddress;
import java.net.ProxySelector;
import java.net.URI;
import java.net.http.HttpClient;
import java.net.http.HttpRequest;
import java.net.http.HttpResponse;
import java.nio.charset.StandardCharsets;
public class Demo {
public static void main(String[] args) throws Exception {
// app_key uses ASCII characters (URI.create does not accept unencoded non-ASCII characters)
String api = "https://api.duckip.cn/web_v1/ip/get-ip-v3?app_key=YOUR_APP_KEY&num=1&cc=DE&life=30&format=txt&protocol=1&lb=1";
HttpClient plain = HttpClient.newHttpClient();
HttpResponse<String> extract = plain.send(
HttpRequest.newBuilder(URI.create(api)).timeout(java.time.Duration.ofSeconds(20)).build(),
HttpResponse.BodyHandlers.ofString(StandardCharsets.UTF_8));
if (extract.statusCode() != 200) {
System.out.println("Extraction failed: HTTP " + extract.statusCode() + " " + extract.body());
return;
}
String ipPort = extract.body().trim().split("\\R")[0]; // format: ip:port
System.out.println("Extracted proxy: " + ipPort);
String[] hp = ipPort.split(":");
HttpClient client = HttpClient.newBuilder()
.proxy(ProxySelector.of(new InetSocketAddress(hp[0], Integer.parseInt(hp[1]))))
.connectTimeout(java.time.Duration.ofSeconds(20))
.build();
HttpResponse<String> resp = client.send(
HttpRequest.newBuilder(URI.create("https://api.ip.cc/")).timeout(java.time.Duration.ofSeconds(20)).build(),
HttpResponse.BodyHandlers.ofString(StandardCharsets.UTF_8));
System.out.println(resp.statusCode() + " " + resp.body());
}
}Return fields are subject to the actual situation The return structure of different plans/versions may vary slightly. When accessing for the first time, please print the complete response first, confirm the field names (such as ip, port, account password fields, etc.) before writing the parsing logic, and do not copy the key names from the example.
Step 4: Connect the API extraction to the antidetect browser
- Confirm that the extraction quantity is 1
- Interface Location: Dashboard 'API Extraction' page
- How to operate: Change the extraction quantity to 1 before copying the link.
- Expected Result:
num=1in the link.
- In the environment's proxy settings, select the 'API Fetch' method
- Interface Location: antidetect browser → New / Edit Environment → Proxy Information
- How to operate: Select the proxy method "API extraction" or "Use proxy platform API to extract link", and paste the link.
- Content to fill in: Keep the service provider set to Universal, choose the required proxy protocol, and optionally select Extract a new IP every time the window is opened.
- Set refresh interval and deduplication
- Interface Location: Options such as 'Refresh URL' and 'Check for Duplicates'
- How to operate: Set the refresh interval for your workload. Enable Check Duplicates to avoid assigning a previously used IP to the same profile.
- Tip: Checking for duplicates will result in additional extraction counts, so pay attention to balancing with traffic / quota budget.
- Click 'Test Extraction / Check Proxy'
- Interface Position: Button on the right side of the link input box
- How to operate: Save and open the environment after the test passes.
- Expected Result: Returns a success message and displays the egress country/city.
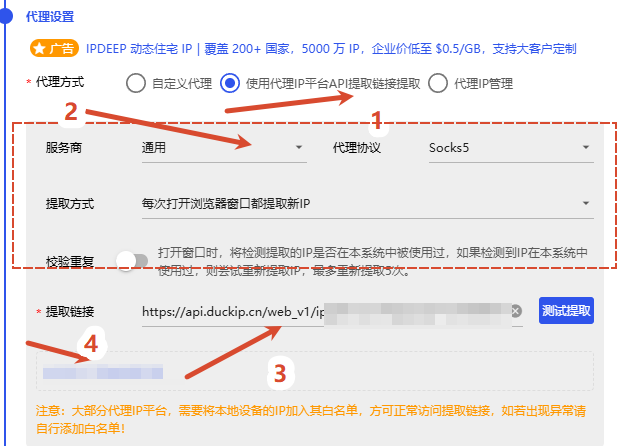
Refer to red marks 1–4 and the 'Verify Duplicates' instructions. For the proxy method, select 'Use proxy IP platform API to extract links' → choose the service provider and protocol → paste the extraction link → click 'Test Extraction'
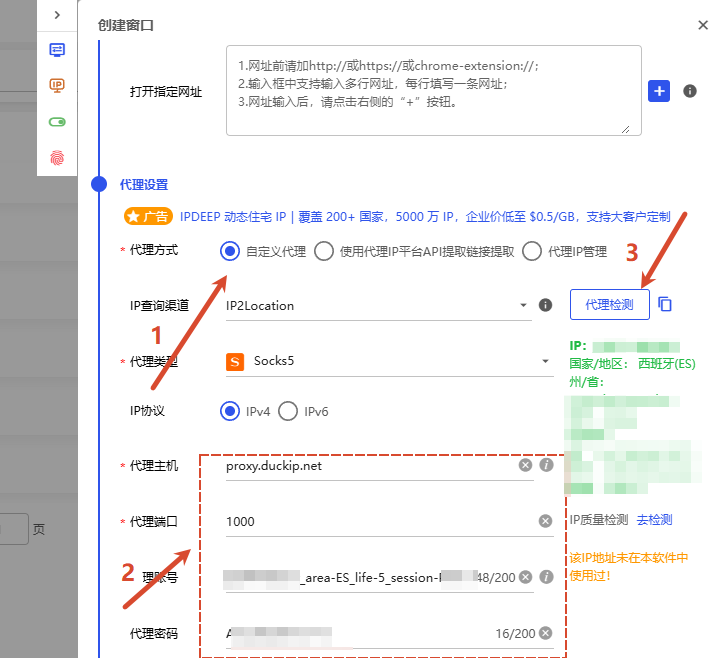
View 'Proxy Method' and 'Proxy Detection' to select a custom proxy or API extraction method, and set the proxy type, host, port, username, and password
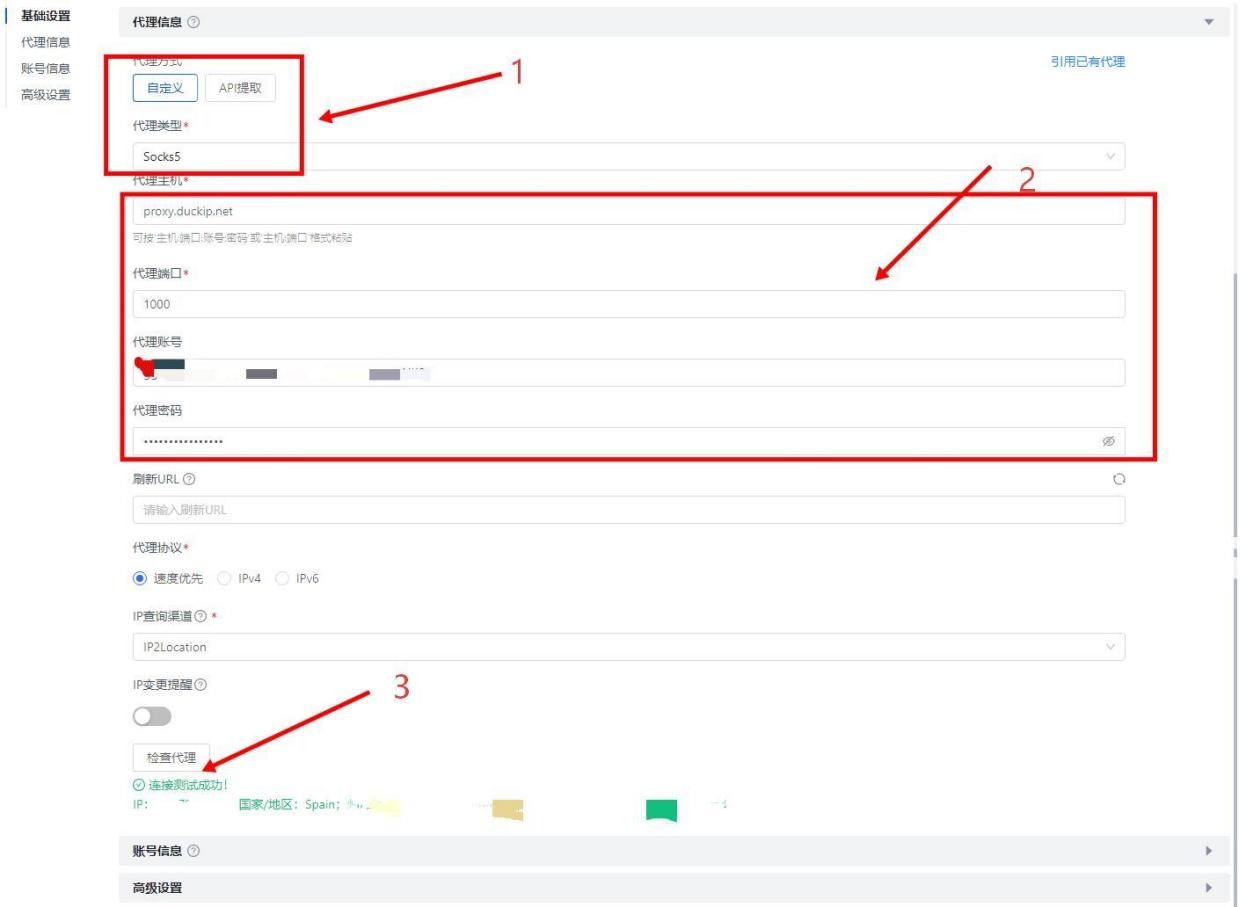
See 'Connection Test Successful' and Exit Country In the example, after entering the socks5 proxy, click 'Check Proxy', and it will return 'Connection Test Successful' and the exit country
Two prerequisites for antidetect browsers ① The extraction quantity must be 1, otherwise the egress IP in the same environment will drift; ② The whitelist must match the egress IP of the upstream node, and it must be updated synchronously after the upstream IP changes.
Step 5: Security and Operations Recommendations
| Risk Points | Recommendations |
|---|---|
app_key leak | Do not write the full extraction link into frontend code, client installation plans, or public repositories; store it via backend relay or environment variables. |
| Whitelist Abuse | The whitelist allows up to 10 IPs. Please add entries for different upstream nodes separately and record their purpose in the notes. Regularly clean up entries that are no longer in use. |
| Frequently requesting to consume quota | Cache IP according to business rhythm (for example, reuse within life) to avoid extracting it anew for each request. |
| IP Attribution Anomaly | First, use multiple detection sites for cross-validation, then determine whether it is a parameter issue or a lag in a third-party IP database. |
| No logs during exceptions | Record extraction time, region, returned IP, and target site response to help determine whether the issue is on the extraction side or the target site side. |
Need a stable egress IP? For account, payment, or store workflows that require a stable egress IP, use a static residential proxy with username/password authentication or configure a sticky session for a dynamic residential proxy instead of relying on API rotation.
Related Documents Proxy Usage Instructions (Command Line / Code / Client Integration) | Parameter Details and Generation Format