
Hubstudio Setup
Category: antidetect browser | Updated Date: 2026-09-14
Hubstudio supports referencing existing proxies, making it suitable for team reuse of routes; this page provides the full process from environment creation to verification.
On this page:
- Step One: Getting to Know the Main Interface
- Step 2: Create a new environment
- Step 3: Fill in the proxy information and check
- Step 4: Environment Setup and Fingerprint
- Step 5: Open the environment and verify
- Hubstudio Frequently Asked Questions
In Hubstudio's environment list, each environment has its own 'proxy information' and supports 'referencing an existing proxy', making it suitable for a team to reuse the same set of lines. This page provides operational details in the order of 'create a new environment → fill in the proxy → check → open for verification'.
① Create a new environment → ② Fill in the proxy information → ③ Check proxy → ④ Set up fingerprint → ⑤ Open environment check
Check the plan status before starting work If a yellow notice saying 'Team plan has expired, related features are limited' appears at the top of the interface, the administrator needs to handle the plan status first; otherwise, creating a new environment or proxy detection may be unavailable.
Step One: Getting to Know the Main Interface
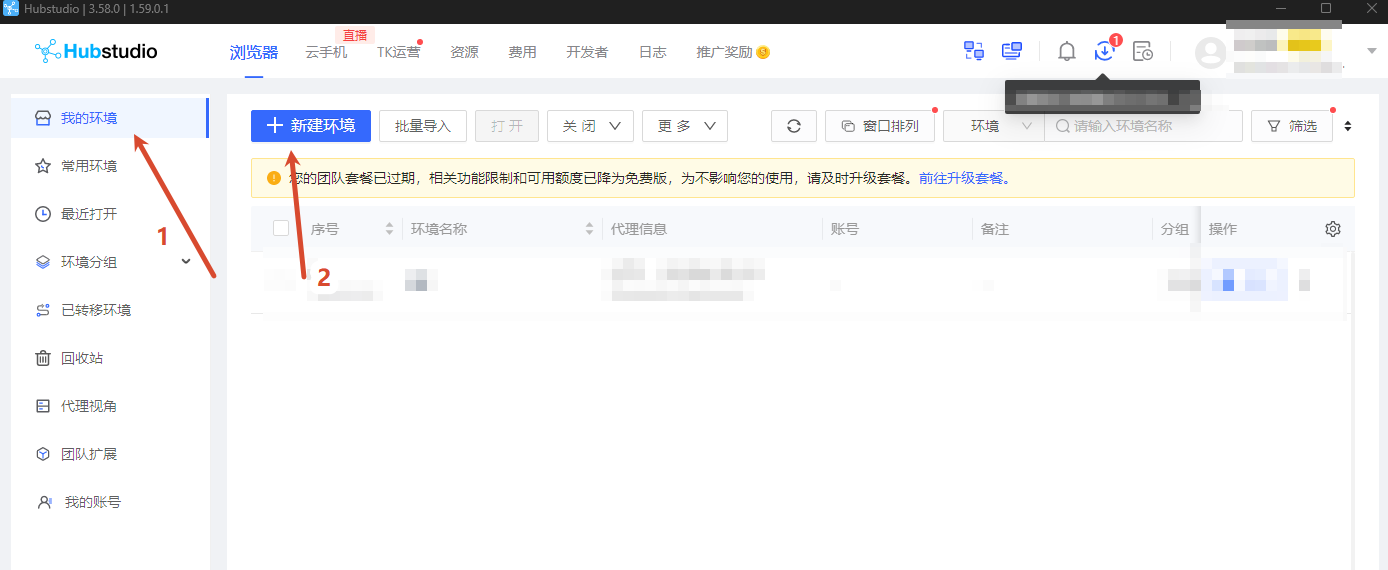
Look at the red marks 1–2 and the top plan prompt. On the left, 'My Environment' → click 'Create New Environment'; at the top, there are also entries for Cloud Phone, TK Operations, Resources, Costs, Developer, etc.
My Environments|Frequently Used Environments|Recently Opened|Environment Groups|Transferred Environments|Recycle Bin|Proxy View|Team Extensions|My Account
| Region | Function |
|---|---|
| Toolbar | New Environment / Batch Import / Open / Close / More / Window Layout |
| List Area | Serial Number, Environment Name, Proxy Information, Account, Remarks, Group, Status, Open Time, Actions |
| Left Navigation | Manage environments by usage frequency (frequently used / recently opened) and grouping |
| Proxy Perspective | View which environments share the same line by proxy dimension, making it easier to troubleshoot number crossover |
Example host is not a fixed value
us.duckip.net:1000(dynamic residential proxy) andas.duckip.net:2000(static residential proxy) are documentation examples. Host prefixes vary by region and product. Always use the host and port copied from your dashboard.
Step 2: Create a New Environment
- Click 'New Environment'
- Interface Position: Toolbar above the environment list
- How to operate: Open the new environment panel; for multiple environments, you can use 'Batch Import' to import according to the table template.
- Expected Result: The 'Create New Environment' panel pops up, with 'Basic Settings / Proxy Information / Account Information / Advanced Settings' on the left.
- You can choose a browser or a cloud phone
- Interface Position: Toggle at the top of the panel
- How to operate: In a regular browser environment, keep 'Browser'; switch to cloud phone for mobile business.
- Expected Result: The panel fields change according to the selected type.
- Fill in the environment name
- Interface Location: "Basic Settings → Environment Name"
- Fill in the content: Include the region and purpose, such as
ES-Advertising-01.
- Expected Result: The name is unique, making it easy to quickly locate in the list.
- Select Browser / Operating System / User Proxy
- Interface Location: Dropdown corresponding to 'Basic Settings'
- How to operate: Select according to the target market; for uncertain items, use random or system options.
- Tip: Do not select exactly the same combination for the entire batch.
- Set up groups and tags
- Interface Location: 'Group' 'Label' fields
- How to operate: Group by team / business line / region to facilitate batch operations and permission allocation.
- Expected Result: After saving, the environment can be found in the list through group filtering.
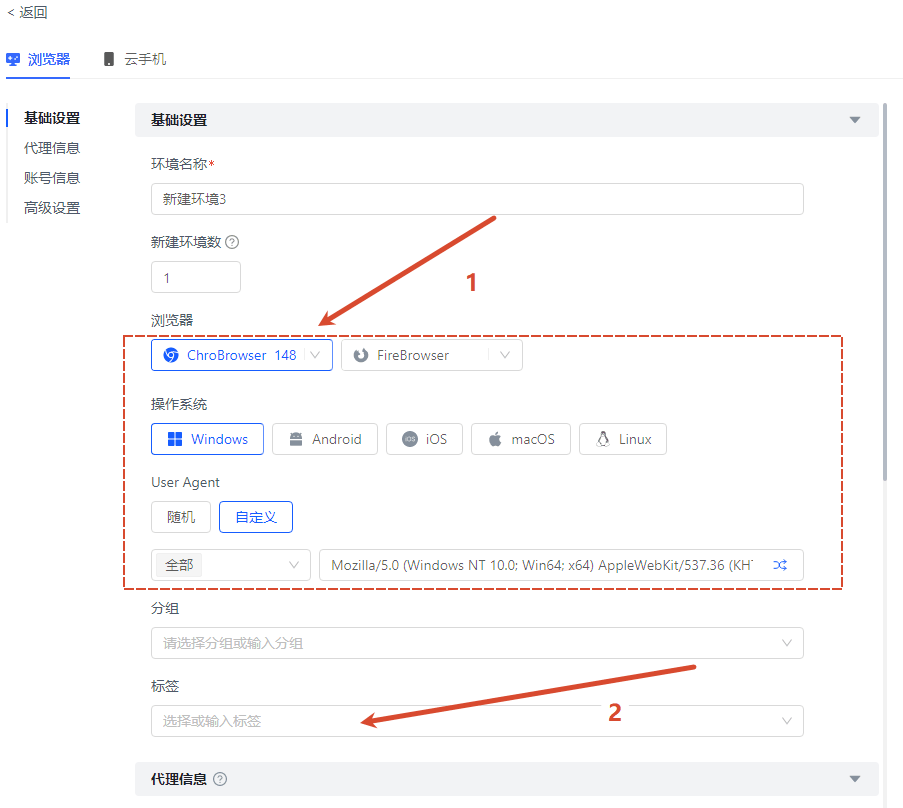
See red annotations 1–2 (browser and tab bar) Annotations 1–2: Select browser / cloud phone → fill in environment name, browser, operating system, User Proxy, group, and tags
Step 3: Fill in Proxy Information and Check
- Switch to the 'Proxy Information' tab
- Interface Location: The second item in the New/Edit Environment panel
- How to operate: Choose the proxy method: custom proxy or API extraction.
- Expected result: Fields such as proxy type, host, port, username, and password appear.
- (Optional) Reference an existing proxy
- Interface Location: 'Quote Existing Proxy' Entry
- How to operate: When the same route is already maintained within the team, it can be directly referenced to avoid duplicate configuration.
- Tip: Using the same proxy will allow multiple environments to share the egress IP and session. This is not recommended for account-related operations.
- Choose the proxy type and fill in the four pieces of information
- Interface Location: "Proxy Type / Proxy Host / Proxy Port / Proxy Account / Proxy Password"
- Fill in the content: Type
Socks5orHTTP; use the host and port values copied from the dashboard (exampleus.duckip.net:1000), and the account should be the full username.
- Expected Result: All four items match the dashboard-generated results, with no extra spaces.
- Set refresh URL (API fetch method only)
- Interface Location: "Refresh URL" input box
- How to operate: Paste the extraction link generated by the dashboard (with an extraction quantity of 1).
- Expected Result: The link can be clicked for testing and returns an IP.
- Set up proxy protocol and IP query channel
- Interface Location: "Proxy Protocol" "IP Query Channel"
- How to operate: Choose the proxy protocol according to your needs: speed priority / IPv4 / IPv6; Keep the IP query channel as default or select IP2Location.
- Note: The IP lookup channel only affects the display of the location, not its availability.
- Enable IP change notifications (recommended for long tasks)
- Interface Location: "IP Change Notification" switch
- How to operate: After enabling, you will receive a notification when the egress IP changes.
- Expected Result: The switch is in the on state.
- Click 'Check Proxy'
- Interface Position: Button on the right side of the proxy information area
- How to operate: Wait for the test to return.
- Expected Result: 'Connection Test Successful' appears, and the exit country/city is displayed (example: Spain).
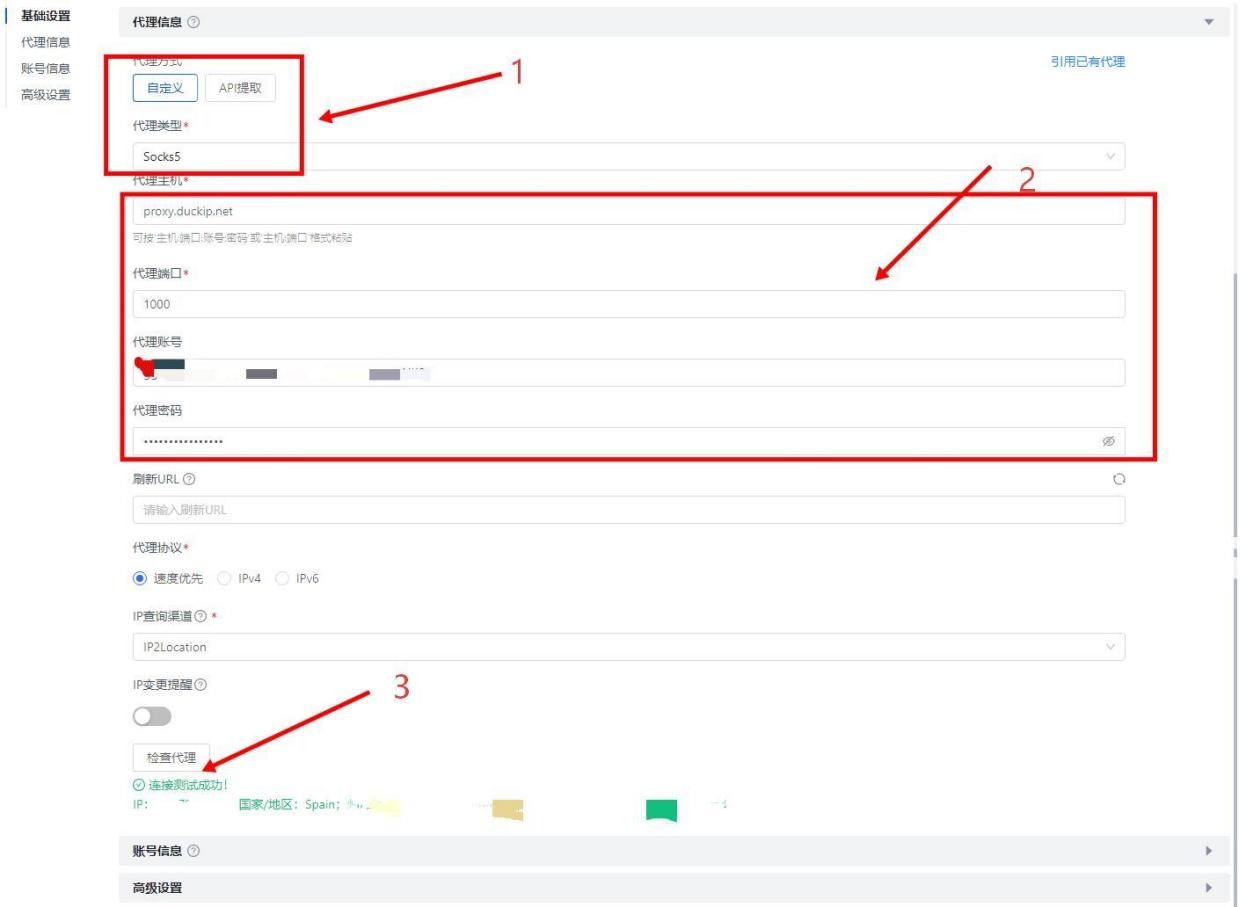
Follow the order of the red marks 1–3 and the test results: select the proxy method → fill in the proxy server information → click 'Check Proxy'; in the example, the test succeeded, and the exit is Spain
| Field | How to Fill | Description |
|---|---|---|
| Referencing Existing Proxies | When the same proxy already exists within the team, it can be directly referenced | Avoid multiple people maintaining the same configuration repeatedly. |
| Proxy Method | Custom / API Extraction | Custom: fill in four pieces of information; API Extraction: paste the extraction link. |
| Proxy Type | Socks5 or HTTP | Both are supported; if detection fails, switch to HTTP first to avoid interference. |
| Proxy Host / Port | Example us.duckip.net / 1000 | Based on the results generated by the dashboard (prefixes may vary by region). |
| Proxy Account / Password | Full Username Sub-account Password | The parameter section in the username cannot be deleted. |
| Refresh URL | Only used when extracting via API | Fill in the extraction link generated by the dashboard. |
| Proxy Protocol | This is the IP protocol (speed prioritized / IPv4 / IPv6), not the proxy protocol | Default is fine; the real proxy protocol is selected in the 'Proxy Type' section, and it can only be HTTP or SOCKS5. |
| IP Query Channel | Default or IP2Location | Used to display the origin location of the IP, unrelated to actual availability. |
| IP Change Reminder | Long Task Recommendation Enabled | Give a prompt when the outbound IP changes. |
Step 4: Environment Setup and Fingerprinting
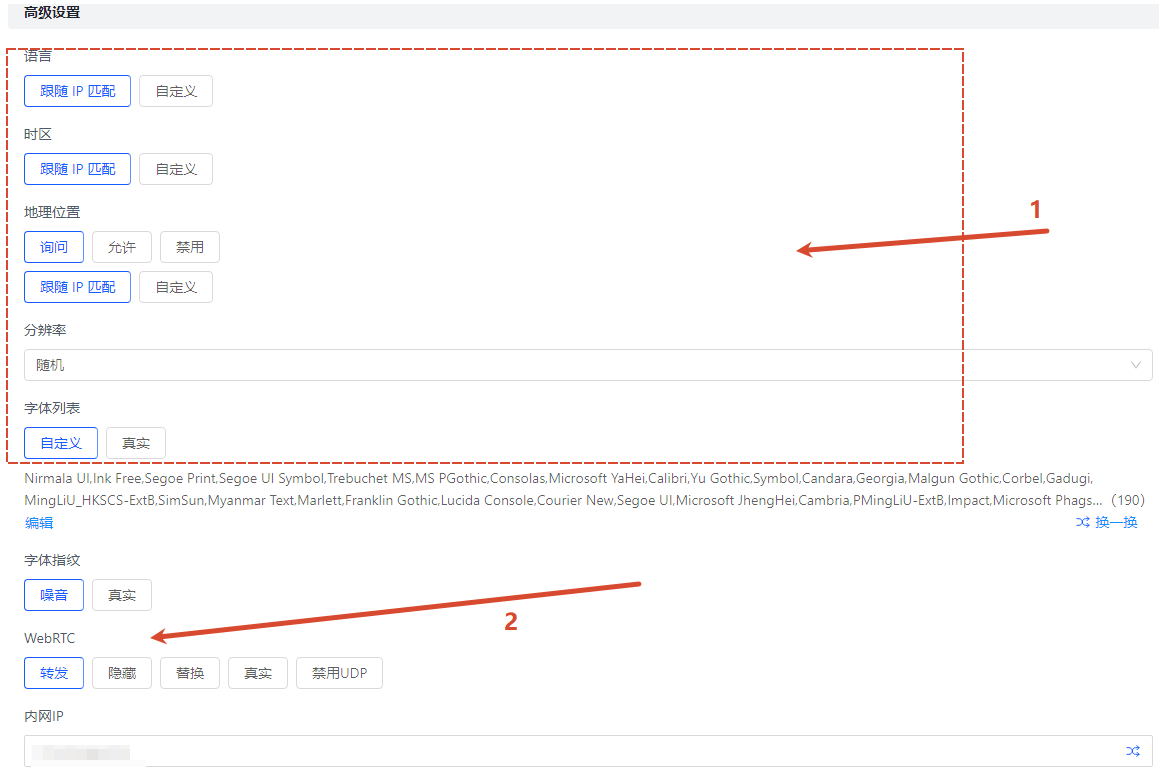
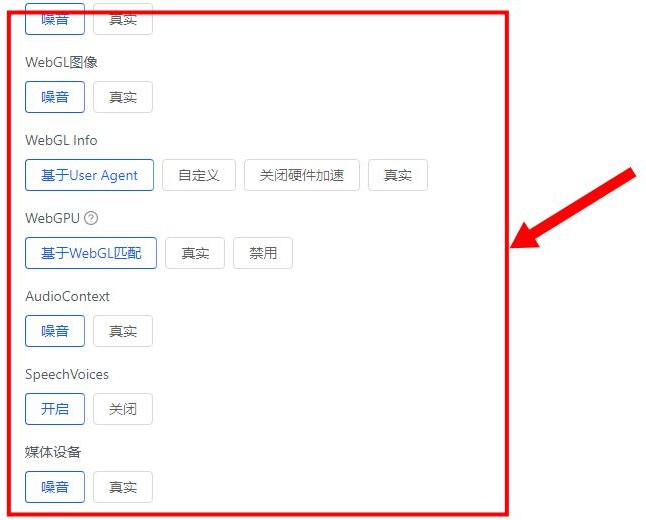
The environment details page of Hubstudio will comprehensively display the key parameters of the current environment (language, time zone, UA, geographic information, etc.), which can be used to quickly check for consistency.
- Check the language and time zone in environment details
- Interface Location: Environment Details Panel
- How to operate: Confirm that the language (e.g., es-ES), time zone, and the country of the proxy exit are consistent.
- Expected Result: Combinations like 'Asian time zone Europe IP' do not appear.
- Verify geographic information with UA
- Interface Location: Key parameter area of the environment details
- How to operate: Confirm that the city matches the proxy region, and that the UA corresponds to the selected operating system.
- Expected Result: Consistent with the mainstream environment of the target market.
- (Optional) Bind Account
- Interface Location: The environment's 'Account Information'
- How to operate: Bind the account that is going to be operated in this environment to the environment, making it easier to confirm ownership during team collaboration.
- Expected Result: Only one business account is bound to an environment.
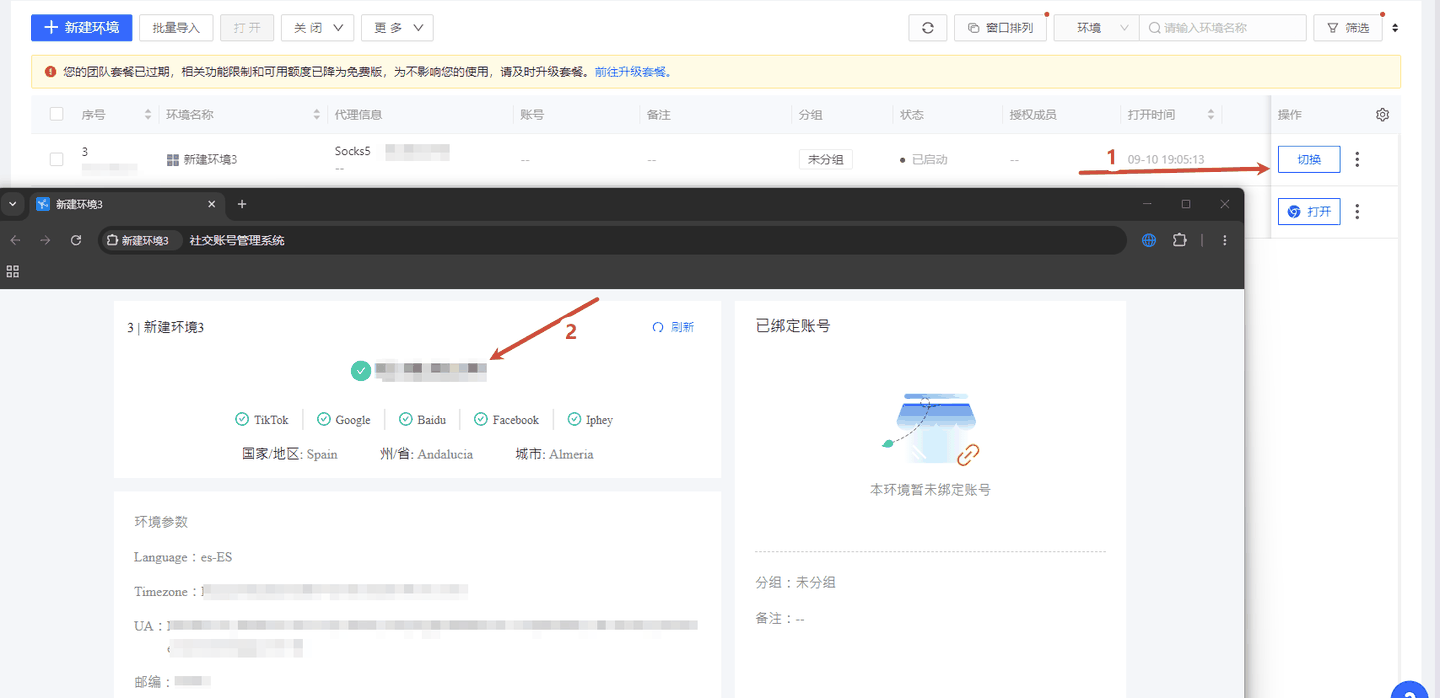
Check the three items: language, time zone, and geographic location. For example, the environment language is es-ES, and the geography is Spain (Andalusia · Almería), consistent with the actual proxy output.
Step 5: Open the environment and verify
- Click 'Open' in the list
- Interface Location: The "Open" column in the environment list
- How to operate: Wait for the environment to finish starting.
- Expected Result: Status changes to 'Started', and the browser window opens normally.
- Use 'Switch' to view environment details when necessary
- Interface Location: The "Toggle" in the action bar
- How to operate: Check the current proxy and account binding status of this environment.
- Expected Result: Consistent with ledger registration.
- Visit the inspection site to confirm the exit
- Interface location: The browser within the environment
- How to operate: Visit
api.ip.ccto check the country / city / ASN. - Expected Result: The output is consistent with the settings and is of the residential type.
- Batch Verify Environment List
- Interface Location: Proxy information / Status / Open time columns in the list
- How to operate: Confirm the correspondence between the environment and the proxy item by item.
- Expected Result: No two environments point to the same proxy.
Look at the red markings 1–2 (toggle button and environment information). Confirm that the environment status has changed to 'Started'. Use 'Toggle' to check the current environment's proxy and account binding if needed.
Check the Proxy Information and Status columns. The list will display the environment name, proxy information, account, group, status, and opening time, making it convenient for batch verification.
Hubstudio Frequently Asked Questions
| Phenomenon | Cause | Resolution |
|---|---|---|
| 'Check Proxy' Failed | Proxy information not saved, protocol mismatch, upstream network exception | Save and then recheck; first HTTP then SOCKS5 to troubleshoot step by step. |
| Environment cannot be opened / Functions are limited | Abnormal team plan status | Retry after the team administrator has handled the plan. |
| The new environment IP is the same as the old environment | References the same existing proxy | Generate separate proxy entries for each environment (independent sessions). |
| After batch import, the proxy is empty | The imported table does not include the proxy column or the column name does not match | Check the template column names, or fill in the proxy in bulk in the 'Proxy View' after import. |
| Team members overwrite each other's configurations | Multiple people share the same proxy entry | Separate proxy pools by member or group, and record ownership in the notes. |
Related Documents Overview & Connectivity Check | Account Credential Extraction | API Extraction & Code Integration