
Dolphin Anty Setup
Category: antidetect browser | Updated Date: 2026-09-14
Dolphin uses profiles as the management unit, and proxy settings are completed at the time of creation; this page breaks down each step from creation to verification.
On this page:
- Step 1: Create a profile
- Step 2: Set up the proxy and verify
- Step 3: Fingerprint and Consistency
- Step 4: Start and Check
- Dolphin Browser Frequently Asked Questions
Dolphin (Dolphin Anty) manages environments by 'profiles,' and proxy settings are configured when creating a profile. After startup, the output can be viewed at any time on the workspace.
① Create profile → ② Fill in the proxy and verify → ③ Fingerprints and Consistency → ④ Startup profile → ⑤ Verify egress IP
Step 1: Create the profile
- Open 'All profiles'
- Interface Location: Client Left Navigation
- How to operate: Enter the full profile list; folders/tags can be used to organize the environment.
- Expected Result: Able to see the profile list and the create button.
- Click 'CREATE PROFILE'
- Interface Position: Main button at the top of the list
- How to operate: Open the creation panel (you can also use QUICK PROFILE for quick creation).
- Expected Result: The panel displays fields such as Profile name, Status, Tags, Folder, Profile type, Start pages, etc.
- Fill in basic information
- Interface Location: General area
- Fill in the content: Profile name (including region and purpose), Status, Tags, Folder.
- Expected Result: The name is unique in the list.
- Select profile type and startup page
- Interface Location: 'Profile type' 'Start pages'
- How to operate: Select the type according to the business (None / FB / Google / TikTok / Crypto, etc.), and add commonly used backends to the startup page.
- Note: The type only affects preset templates and does not change proxy behavior.
- (Team) Confirm 2FA
- Interface Location: Client Security Alerts / Team Settings
- How to operate: Enable two-step verification as required by the team.
- Expected Result: After being enabled, a second verification is required when logging in again.
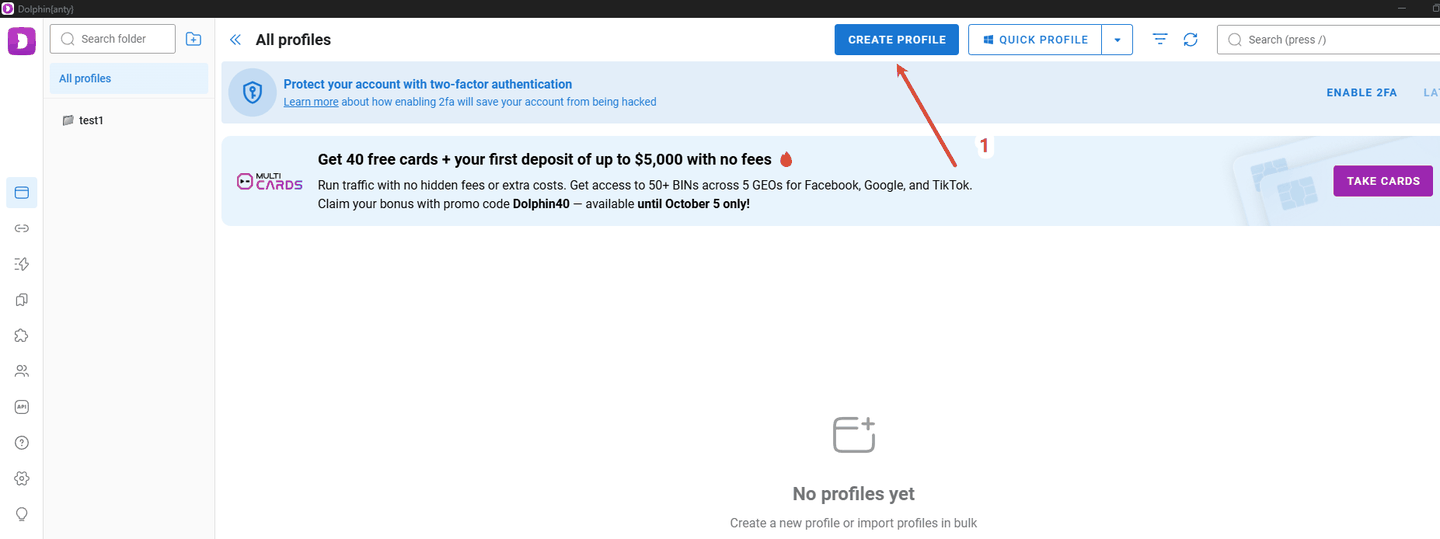
Look at the red mark 1 (Create button) and the folder list on the left. Click "CREATE PROFILE" to create a profile; on the left, you can organize environments by folders.
Step 2: Set Up Proxy and Verify
- Switch to the proxy settings area
- Interface Location: Proxy area of the create profile panel
- How to operate: Choose New proxy (create new) or Saved proxy (reuse saved proxy).
- Expected Result: Fields such as Protocol, Host, Port, Username, Password, etc. appear.
- Select the protocol
- Interface Location: Protocol Selector
- How to operate: Choose HTTP or SOCKS5 — Duckip Proxy only supports these two protocols.
- Tip: If options like SOCKS4 or SSH appear in the panel, please do not select them: Duckip Proxy only supports HTTP and SOCKS5.
- Fill in the host, port, username, and password
- Interface Location: Host / Port / Username / Password
- Fill in the content: The host and port are the values copied from the dashboard (example
us.duckip.net:1000), the username includes the parameter section, and the password is the sub-account password.
- Expected Result: All four items match the results generated by the dashboard.
- (Optional) Fill in Change IP URL
- Interface Location: "Change IP URL (Optional)"
- How to operate: When automatic rotation is needed, paste the API extraction link (with the extraction quantity set to 1).
- Tip: Leave blank when not rotating to avoid login status issues caused by changes in the egress IP.
- Create profile after verifying the proxy
- Interface Location: Verification / Check button in the panel "CREATE PROFILE"
- How to operate: First verify (it will display the egress IP and country), and after confirming everything is correct, click Create.
- Expected Result: The verification results show that the country matches the expectation (for example, the egress location is Germany).
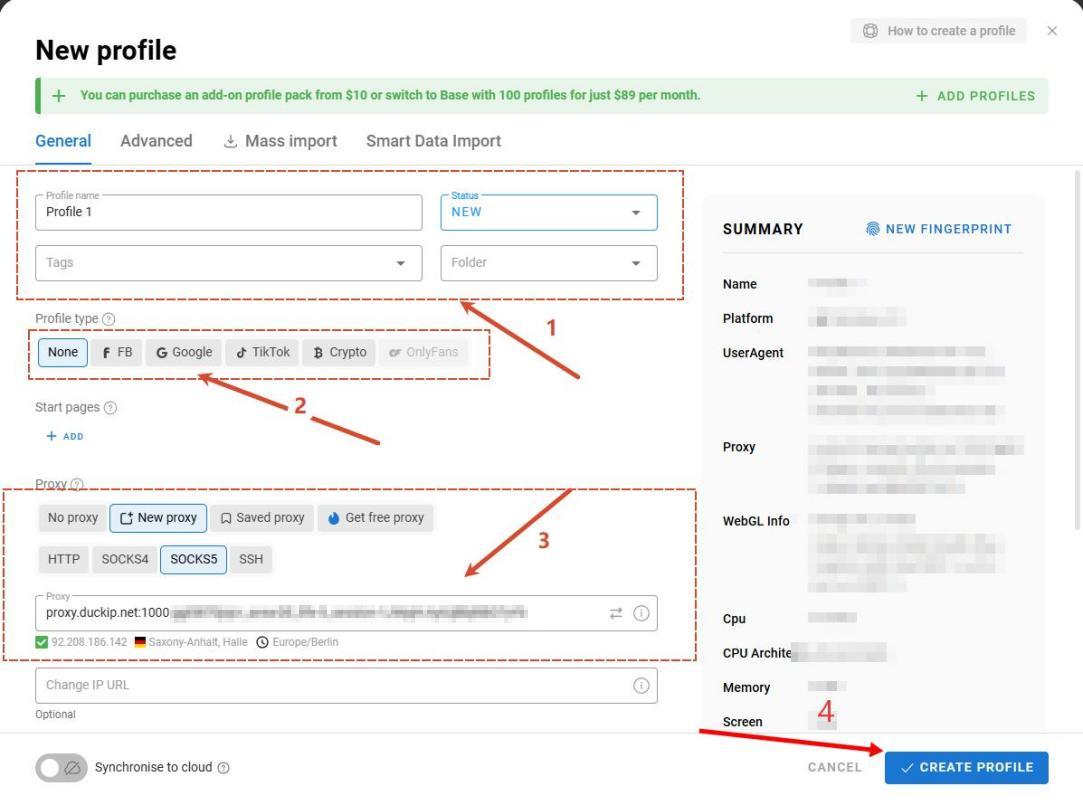
Check the protocol dropdown in the Proxy area and the already entered egress IP. Note the Profile name / Status / Folder, Profile type, Start pages, as well as the Proxy's protocol, Host, Port, Username, Password, and Change IP URL
Step 3: Fingerprints and Consistency
| Configuration Item | Recommendation |
|---|---|
| Fingerprint Type / Platform | Consistent with target market (e.g., Windows target country time zone) |
| Time Zone / Language | Follow the proxy exit country |
| WebRTC | Disable or Follow Proxy |
| Canvas / WebGL / Audio | Keep random, avoid cross-environment repetition |
| 2FA | It is recommended that the team enable it to prevent the account from being logged in by others and modifying the environment |
Example host is not a fixed value
us.duckip.net:1000(dynamic residential proxy) andas.duckip.net:2000(static residential proxy) are documentation examples. Host prefixes vary by region and product. Always use the host and port copied from your dashboard.
Verify before creating After filling in the proxy, first click 'Verify' to confirm that the returned country/city matches your expectations, then click 'CREATE PROFILE' to submit. This can prevent the problem of realizing you can't connect only after finishing the setup.
Step 4: Start and Check
- Click to launch the profile
- Interface Location: The launch button (Run / Start) in the list
- How to operate: Wait for the browser window to open and the status to change to running.
- Expected Result: The list shows that the profile has started, and a timer (Worktime) appears.
- Verify the outgoing IP
- Interface Location: Newly opened browser window
- How to do it: Visit 'api.ip.cc' and compare countries and cities.
- Expected Result: The returned
country_codematches the proxy setting (example is DE).
- Expected Result: The returned
- Stop the profile when necessary
- Interface Location: STOP button in the list
- How to operate: Stop after the task is completed and release the environment and proxy resources.
- Expected Result: The status returns to Not Running.
- Record the profile details
- Interface Location: Team records
- How to operate: Register the profile name, session, region, and bound account.
- Expected Result: The environment can subsequently be located through the ledger.
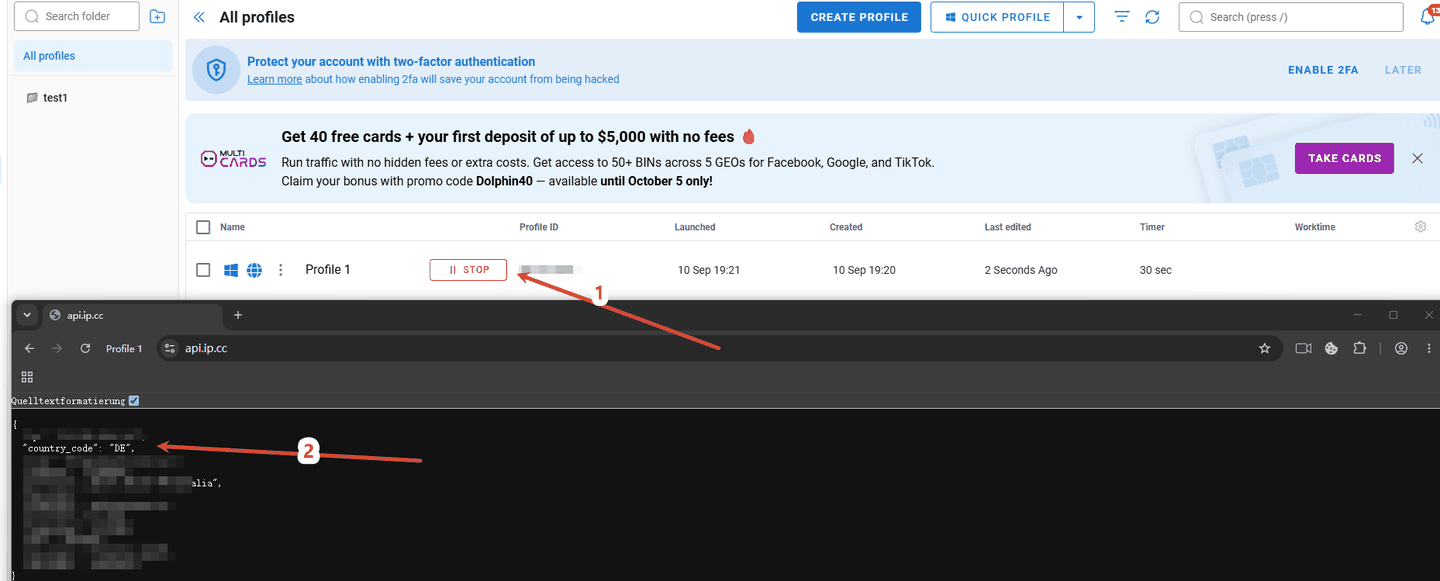
See red mark 1–2: STOP and egress country. In the example, the profile has been activated (you can click STOP to stop), and the page returns country_code: DE, consistent with the proxy settings.
Promotional banner can be ignored The banners such as 'Claim Card / First Recharge Bonus' that occasionally appear on the client are unrelated to this process and can be closed directly without affecting the proxy configuration.
Dolphin Browser Frequently Asked Questions
| Phenomenon | Cause | Resolution |
|---|---|---|
| Profile failed to start | Proxy filled in incorrectly or plan expired | First, redo proxy verification on the creation page; confirm the plan validity period. |
| IP does not change after startup | Reused the old proxy from Saved proxy | Changed to New proxy and refilled the proxy extracted this time. |
| Multiple profiles have the same IP | Share the same proxy or the same session | Generate independent proxy entries for each profile. |
| Midway egress IP change | Change IP URL has been filled in and rotation is triggered | Clear this field when a stable identity is needed, or increase life. |
| Page prompts for 2FA verification | The team has enabled two-factor authentication | Complete the verification according to the team administrator's instructions, do not skip. |
Related Documents Overview and Connectivity Check | Parameter Details and Generation Format | Quick Troubleshooting Reference