
Cache Proxy (Optional)
Category: Proxy Extraction | Updated: 2026-09-14
Cache proxy is an optional advanced feature: it trades cache for traffic savings, but only supports HTTP, and requires installing the cache access certificate according to the official tutorial.
On this page:
- What is a caching proxy
- When it is suitable / not suitable
- Start and Installation: Step-by-Step Instructions
- Verify whether the cache is effective
- Common Problems and Troubleshooting
Cache proxy is an optional advanced feature: when enabled, the gateway will prioritize returning static resources from the cache, reducing repeated downloads, improving access speed, and saving bandwidth (the dashboard indicates "saves 20%"). This page, following the order of the official tutorial, breaks down the four sections of "turn on the switch → download the certificate → install the certificate → verify" into actionable steps.
① Enable cache proxy switch → ② Download SSL Certificate → ③ Install the certificate to the Trusted Root → ④ Verify that the cache is effective
First, remember three hard limits ① After enabling the caching proxy, only the HTTP protocol can be used (the official documentation also clearly indicates this); ② You need to download and install the SSL certificate, otherwise a certificate untrusted error will occur; ③ BitBrowser is not supported when using the caching proxy — if you need to continue using BitBrowser, please disable the caching proxy or switch to another antidetect browser.
1. What is a caching proxy
The caching proxy will cache specified types of static resources; when a new request matches the resources in the cache, it is returned directly from the cache without going back to the origin site. The dashboard will display the cache switch, cache traffic details entry, and the list of currently supported resource formats.
| Dimension | Description |
|---|---|
| Scope of Effect | Preferentially hit the same static resources already existing in the cache; the cache validity period and determination rules are subject to the dashboard instructions |
| Protocol Limitation | Only HTTP protocol is supported. Do not use SOCKS5 to access the same batch of targets after enabling |
| Additional Requirements | SSL certificate needs to be downloaded and installed (example filename duckip.crt), installed to the 'Trusted Root Certification Authorities' |
| View Data | The dashboard provides an entry for 'Cache Traffic Details', allowing you to view the traffic situation of cache hits |
| Supported Formats | Covers common static resource types, such as .jpg / .png / .gif / .svg / .css / .mp3 / .mp4 / .avi / .pdf / .doc / .ppt / .zip / .rar / .7z / .exe / .apk, etc. (For the complete list, refer to the display in the dashboard) |
| Client Compatibility | When using a caching proxy, BitBrowser is not supported; if using BitBrowser, please disable the caching proxy, or switch to other clients like AdsPower / Hubstudio / Dolphin |
Example host is not a fixed value
us.duckip.net:1000(dynamic residential proxy) andas.duckip.net:2000(static residential proxy) are documentation examples. Host prefixes vary by region and product. Always use the host and port copied from your dashboard.
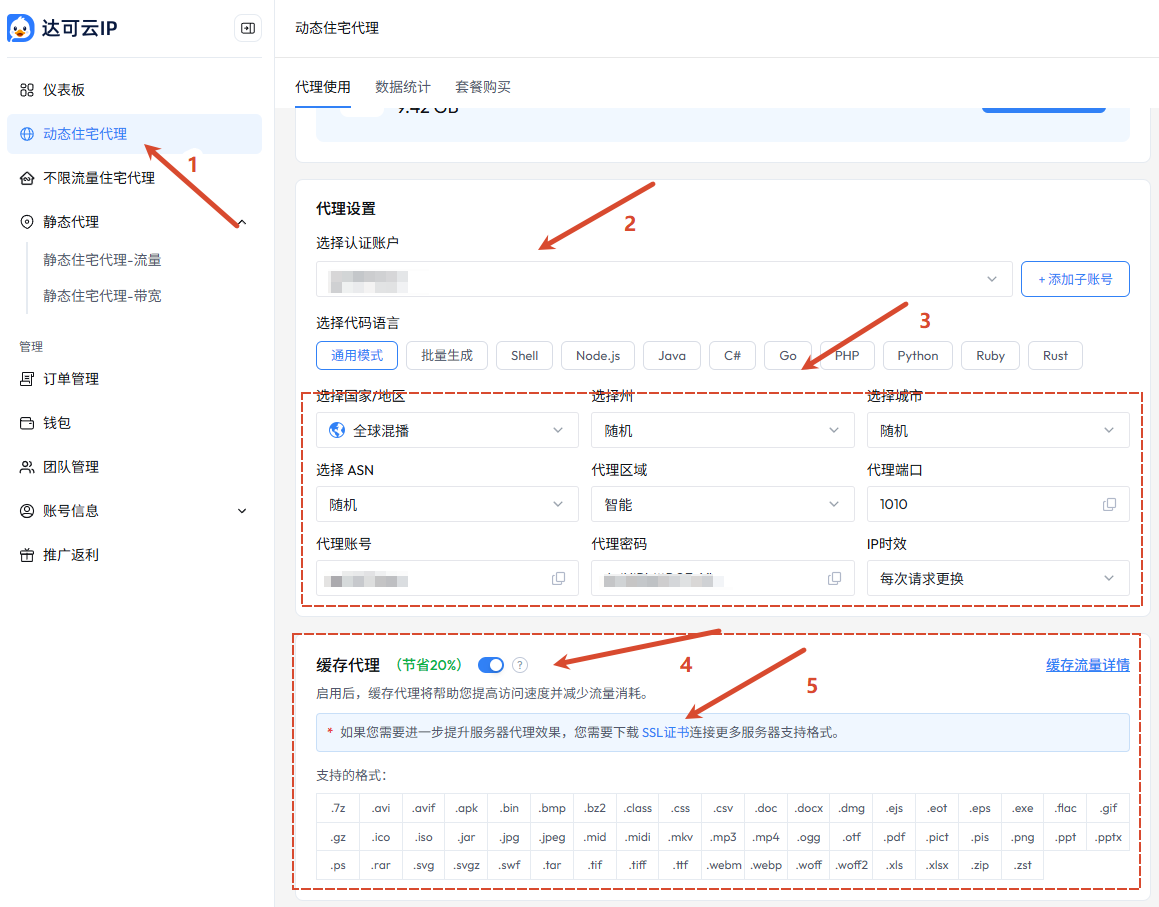
Look at the red annotations: ④ Cache proxy switch, ⑤ SSL certificate prompt. Go to Dynamic Residential Proxy → Proxy Usage, turn on "Cache Proxy (save 20%)" in the settings area, and pay attention to the SSL certificate prompt and the supported format list.
Not recommended to enable by default If you are unsure whether it applies to your business, just keep it turned off: caching only works for 'identical static resource requests' and does not benefit tasks that require real-time data, login status, or dynamic interfaces; it may instead return outdated content.
2. When It Is Suitable / Not Suitable
| Suitable to start | Not suitable to start |
|---|---|
| Batch and repeated fetching of static resources (images, styles, documents, compressed files) from the same set of pages | Real-time prices, real-time inventory, interfaces and search pages with second-level changes |
| Repeated verification of the same batch of URLs (for example, multiple rounds of reviewing the same target) | Requires strict login sessions, order processes, and other stateful operations |
| Hope to reduce traffic costs, and the target can be accessed via HTTP | Targets that can only be accessed via HTTPS / SOCKS5 |
3. Powering On and Installation: Step-by-Step Operations
- Turn on the 'Cache Proxy' switch
- Interface Location: Dynamic Residential Proxy → Proxy Usage → Settings Area 'Cache Proxy (Save 20%)'
- How to operate: Turn the switch to the on position, and read the instructions next to it along with the "Cache Traffic Details" entry.
- Expected Result: The switch is in the on position, and the page displays an SSL certificate prompt along with a list of supported formats.
- Download the SSL certificate
- Interface Location: Certificate download prompt / link on the page
- How to operate: Click download to get the certificate file (example:
duckip.crt). You can confirm the source is the dashboard domain in the browser's download history.
- How to operate: Click download to get the certificate file (example:
- Expected Result: The certificate file appears in the download record, with the status marked as Completed.
- Right-click the certificate in File Explorer → 'Install Certificate'
- Interface Location: Certificate file in the File Explorer (for example,
duckip.crtin the Downloads directory) - How to operate: Right-click the certificate file and select 'Install Certificate' from the menu.
- Interface Location: Certificate file in the File Explorer (for example,
- Expected Result: The certificate import wizard pops up.
- Handling Windows Security Warnings
- Interface Location: System pop-up "Open File - Security Warning"
- How to operate: After confirming that the file name and source are correct, click 'Open (O)' to continue; Official documentation tip: When a security warning appears, click 'Yes' to confirm the installation.
- Tip: If the source is unknown, cancel first and download the certificate again from the dashboard. Do not install certificates from unknown sources.
- Choose storage location: Current user
- Interface Location: "Certificate Import Wizard → Storage Location"
- How to operate: Select "Current User (C)", click "Next".
- Expected Result: The wizard enters the 'Certificate Store' page.
- Designated Storage: Trusted Root Certification Authorities
- Interface Location: "Certificate Import Wizard → Certificate Store"
- How to operate: Select 'Place all certificates in the following store (P)', click 'Browse (R)...', choose 'Trusted Root Certification Authorities', and after confirming, click 'Next'.
- Expected Result: The certificate store path is displayed as 'Trusted Root Certification Authorities'.
- Complete the import
- Interface location: The last page of the wizard
- How to operate: After confirming the settings, click 'Done'. When you see 'Import Successful', click 'OK' to close.
- Expected Result: A prompt appears stating 'Import Successful'. If the system shows a security warning, click 'Yes' to confirm the installation.
- Restart the program that calls the proxy
- Interface Location: Business Application / Browser / antidetect browser Environment
- How to operate: After closing, restart to allow the program to reload the system certificate chain.
- Expected Result: Accessing the HTTP target no longer shows an untrusted certificate warning.
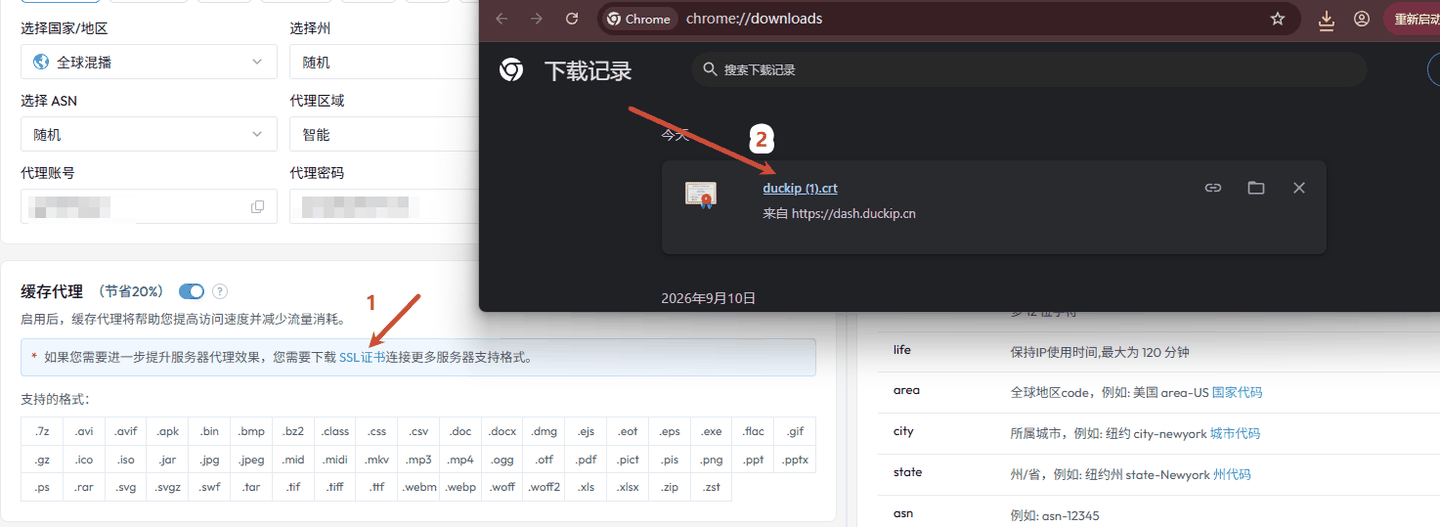
Check the file source in the prompt and download history: the certificate prompt on the proxy configuration page (red arrow 1) and the certificate file in Chrome download history (red arrow 2, sourced from the dashboard domain)
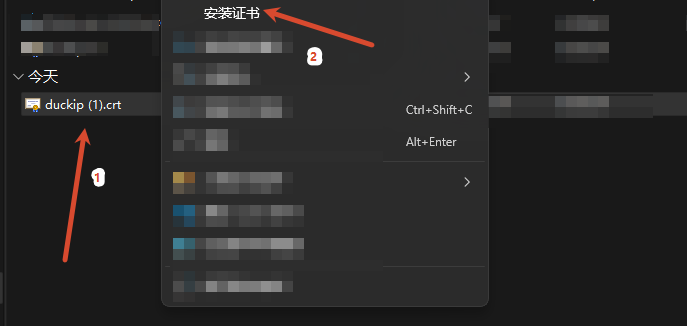
Look at the 'Install Certificate' item in the right-click menu Right-click the certificate file in Explorer and select 'Install Certificate'
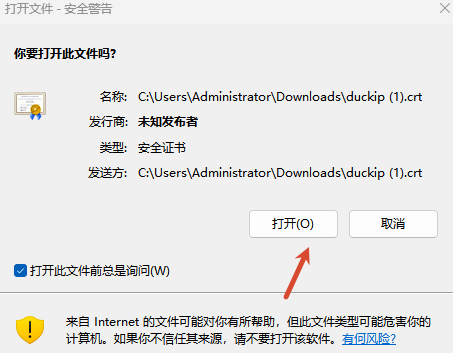
Check the file name and publisher field. The system will prompt 'Do you want to open this file?'. After confirming the source, click 'Open (O)'; when the official documentation prompts a security warning, click 'Yes' to confirm the installation.
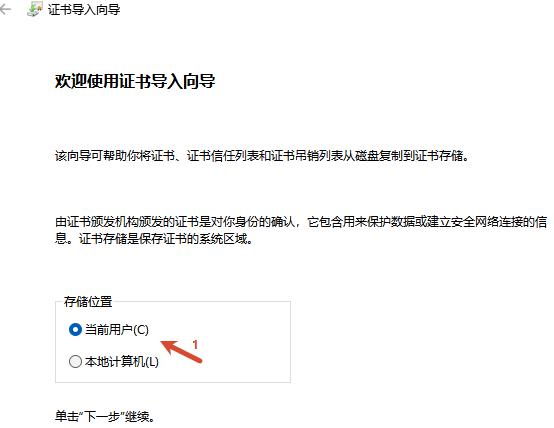
Look at the red mark 1. On the Certificate Import Wizard welcome page, set the storage location to 'Current User (C)', then click 'Next'
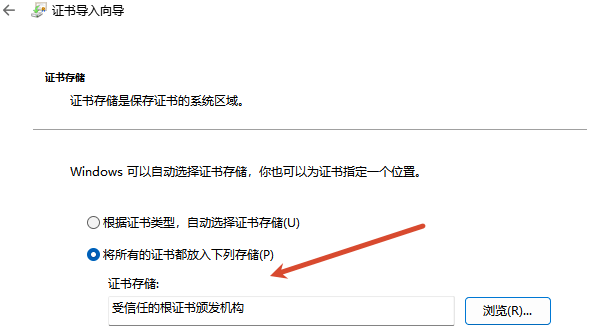
Look at the content of the 'Certificate Store' input box, select 'Place all certificates in the following store (P)', click 'Browse (R)...' and choose 'Trusted Root Certification Authorities'
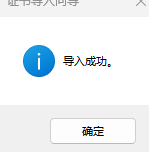
Look at the blue information icon and the prompt text. The wizard will indicate 'Import Successful.' Click 'OK' to finish the installation.
4. Verify Whether the Cache Is Effective
Initiating two requests for the same HTTP static resource, comparing the time taken and the return size: the first time fetching from the origin, and the second time hitting the cache is usually noticeably faster.
# 1) Request latency when cache is not enabled (or not hit)
curl -s -o /dev/null -w "time=%{time_total}s size=%{size_download}B\n" -m 20   -x "http://subaccount:subaccount_password@us.duckip.net:1000" http://target-site/static-resource

# 2) After enabling the cache and installing the certificate, repeatedly execute on the same address to compare the time and size
curl -s -o /dev/null -w "time=%{time_total}s size=%{size_download}B\n" -m 20 -x "http://subaccount:subaccount_password@us.duckip.net:1000" http://target-site/static-resource| Verification Item | Expected Result | When Not Met |
|---|---|---|
| Certificate Status | After installation, accessing the HTTP target no longer prompts that the certificate is untrusted | Reinstall the certificate into 'Trusted Root Certification Authorities', making sure to select 'Current User'. |
| Request time | The second request for the same resource is significantly faster | Confirm that the resource type is included in the supported formats list and that the two request URLs are exactly the same. |
| Hit Status | Cache hit data can be viewed in 'Cache Traffic Details' | Confirm that the switch is turned on; confirm that only the HTTP protocol is used. |
| Is the content up-to-date | After static resources hit the cache, the content is the cached version | For targets with high real-time requirements, disable the cache, or change the request parameters to bypass the cache. |
5. Common Issues and Troubleshooting
| Phenomenon | Possible Cause | Resolution |
|---|---|---|
| Prompt: Certificate not trusted / SSL error | Certificate not installed, or installed in the wrong store | Reinstall according to the steps in the third paragraph above, and make sure to place it in the 'Trusted Root Certification Authorities'. |
| After enabling, web pages cannot be opened at all | The target site only supports HTTPS, while the caching proxy only supports HTTP | Disable caching, or switch to a link that does not use caching to access the site. |
| Always returning old content | Cache hit | Disable cache for targets with high real-time requirements; cache only applies to 'identical static resource requests'. |
| No acceleration effect | The requested resource type is not in the supported list, or the request itself is not a repeat | Check the list of supported formats; confirm that it is indeed a repeated request for the same resource. |
| Clicked 'Cancel' by mistake when installing the certificate | Wizard not completed | Right-click the certificate again → 'Install Certificate', and go through the wizard from the beginning. |
| Configured proxy in Bit Browser but it is abnormal / unstable | Cached proxy is incompatible with Bit Browser (Bit Browser is not supported when using cached proxy) | Close the cached proxy before using Bit Browser; or switch to clients like AdsPower / Hubstudio / Dolphin, etc. |
Refer to the dashboard tutorial The entry point of the caching proxy, the certificate file name, and the list of supported formats will be updated with each version. Ultimately, please refer to the instructions provided in the dashboard; this article is intended to help you understand the principles, operate in sequence, and troubleshoot issues.
Related Documents Proxy Usage Instructions (Command Line / Code / Client Integration) | Quick Troubleshooting Guide