
BitBrowser Setup
Category: antidetect browser | Updated Date: 2026-09-14
Bit Browser supports custom proxies and API extraction through two paths. This page breaks down the operations of both paths to the field level.
On this page:
- Step One: Getting to Know the Main Interface
- Step 2: Create the window and fill in the proxy
- Step 3 (Optional): Integrate using the API extraction method
- Step 4: Fingerprint Setup
- Step 5: Open the window and verify the IP location
- Common Questions about Bit Browser
Bit Browser separates 'window management' and 'proxy IP management': you can maintain proxies centrally in the proxy IP library, or fill them in instantly when creating a window. It also supports both custom proxies and API extraction links.
① Choose access method → ② Create Window → ③ Fill in the proxy / Paste the extraction link → ④ Fingerprint Settings → ⑤ Open the window to check the IP
| Method | Suitable For | Prerequisites |
|---|---|---|
| Custom Proxy (Account & Password) | Fixed number of environments, requires long-term stable output | Get host:port:user:pass from the dashboard under 'username/password authentication → Bulk Generate' |
| API Extraction | Hope the browser automatically fetches / rotates IP | Generate the link in the dashboard's 'API Extraction', and the extraction quantity must be 1, and first add the pre-set IP to the whitelist |
Example host is not a fixed value
us.duckip.net:1000(dynamic residential proxy) andas.duckip.net:2000(static residential proxy) are documentation examples. Host prefixes vary by region and product. Always use the host and port copied from your dashboard.
Bit Browser is incompatible with cache proxy If the dashboard has enabled a caching proxy, BitBrowser will not be able to use this link properly. Handling methods: ① Disable the caching proxy when using BitBrowser; ② Or keep the caching proxy and switch to other clients such as AdsPower / Hubstudio / Dolphin. See Caching Proxy for details.
Step One: Getting to Know the Main Interface
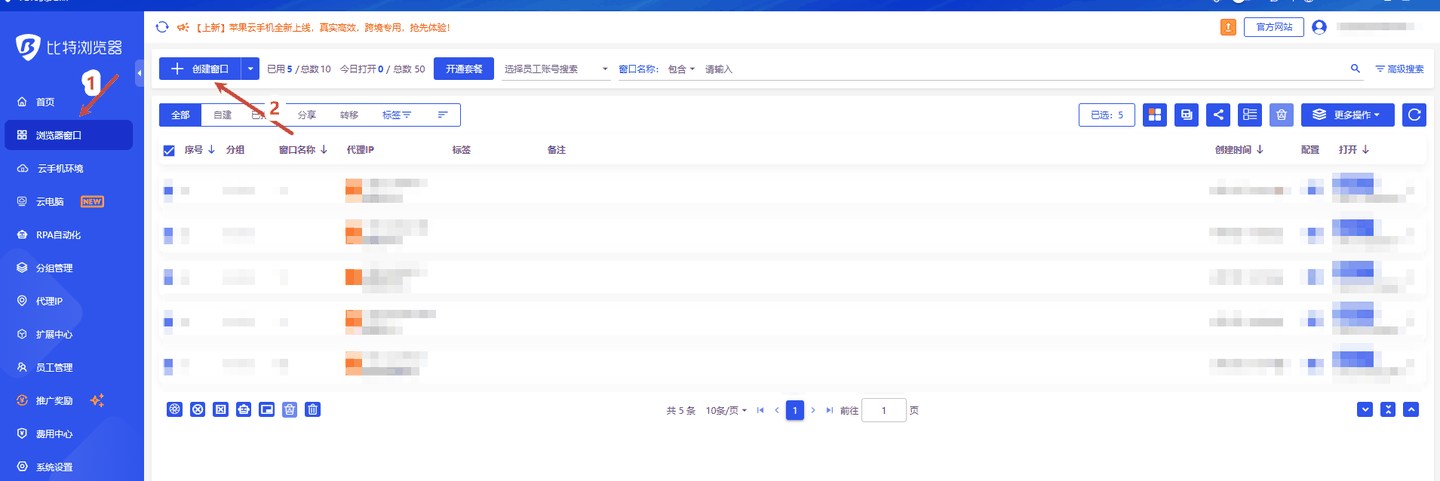
Look at the red markings 1–2 and the quota display in the top left corner. Left side 'Browser Window' → top right 'Create Window'; the interface simultaneously shows used/total and today's opening count
Home·Browser Window·Cloud Phone Environment·Cloud Computer·RPA Automation·Group Management·Proxy IP·Extension Center·Employee Management·Expense Center·System Settings
Step 2: Create a window and fill in the proxy
- Click 'Create Window'
- Interface Position: Top right corner of the browser window list
- How to operate: Open the create window popup and select 'Custom Proxy'.
- Expected Result: Sections for opening the specified website, proxy settings, fingerprint settings, etc., appear in the pop-up window.
- Fill in the websites to keep open permanently (optional)
- Interface Location: 'Open Specified URL' input box
- How to operate: Fill in commonly used addresses such as the store backend and advertising backend, so that opening the window directly enters the work page.
- Expected Result: Automatically redirect when opening the window subsequently.
- Choose Proxy Type and IP Protocol
- Interface Location: Dropdown menus for 'Proxy Type' and 'IP Protocol'
- How to operate: Choose Socks5 or HTTP for the proxy type; select IPv4 / IPv6 for the IP protocol as needed.
- Expected Result: The field displays the selected value.
- Fill in the proxy host and port
- Interface Location: "Proxy Host" "Proxy Port"
- Fill in the content: The host and port in the dashboard results (example
us.duckip.netand1000; the prefix may vary in different regions). - Expected Result: The host and port are completely consistent with the dashboard results.
- Fill in the proxy username and password
- Interface Location: 'Proxy Username' 'Proxy Password'
- Fill in the content: Full username (including the
area / life / sessionparameter segment) and sub-account password. - Tip: Do not remove the parameter segment in the username, otherwise it will fall to a random country or change with each IP switch.
- Perform proxy testing and IP quality testing
- Interface Location: 'Proxy Detection', 'IP Quality Check → Go Check'
- How to operate: First, click on proxy detection to confirm connectivity, then do an IP quality check to see the location and type.
- Expected Result: Detection passes, and the country/state/province matches the dashboard settings.
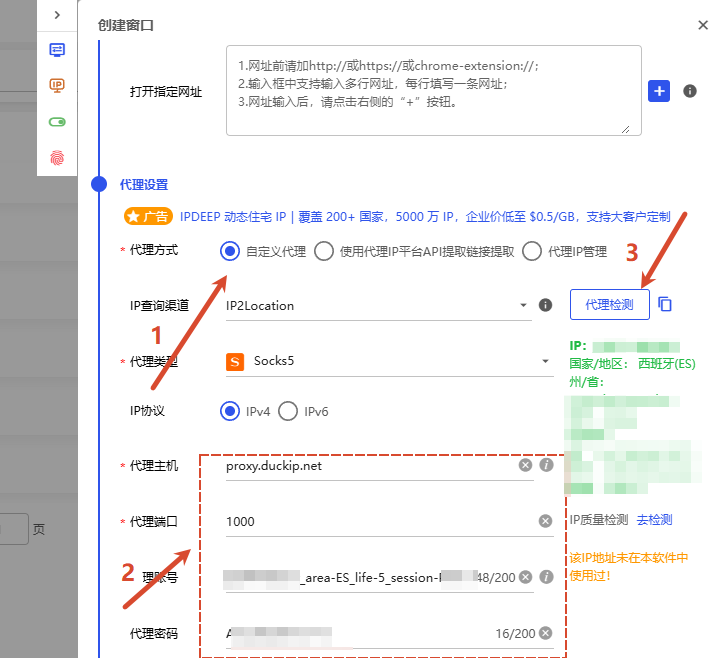
Look at the three places: 'Proxy Mode', 'Proxy Detection', and 'IP Quality Detection'. You can set the proxy mode, proxy type, host, port, account, and password, and perform proxy detection and IP quality detection.
| Field | How to fill |
|---|---|
| Open specified website | Optional, enter the site that needs to be kept open (such as the store backend). |
| Proxy Method | Custom proxy (username/password) or API extraction. |
| Proxy Type | Socks5 or HTTP (both are supported by Duckip). |
| IP Protocol | Choose IPv4 / IPv6 as needed; select IPv4 if unsure. |
| Proxy Host / Proxy Port | The host and port in the generated result, for example us.duckip.net:1000 (example, the actual result depends on the dashboard output). |
| Proxy Username / Proxy Password | Fully copy the username (including area / life / session parameters) and the sub-account password. |
| IP query channel | Keep the default; if consistent geolocation is needed, IP2Location and others can be selected. |
| Proxy Detection / IP Quality Check | Click to test and verify that the returned exit country matches the expected one. |
Step 3 (Optional): Integrate Using API Extraction Method
- First, add the IP of the upstream node to the whitelist
- Interface Location: Dashboard 'Dynamic Residential Proxy → Proxy Usage → Whitelist Management'
- How to operate: Add the egress IP of the current upstream node to the whitelist (up to 10).
- Expected Result: The IP appears in the list.
- Generate extraction link (quantity: 1)
- Interface Location: Dashboard 'API Extraction' tab
- How to operate: Click 'Generate Link' and copy it.
- Fill in the content: quantity to extract
1, country/state/city, IP validity period, data format, protocol, delimiter.- Expected Result:
num=1in the link.
- Expected Result:
- Select the API extraction method in the window
- Interface Location: Create Window → Proxy Settings
- How to operate: For the proxy method, select 'Use proxy IP platform API to extract link', choose 'General' as the service provider, and paste the link.
- Fill in the content: The extraction method can be set to 'Extract a new IP each time the browser window is opened'; if the client provides 'Check for duplicates', it can prevent obtaining IPs that have already been used.
- Expected Result: The link has been entered and the format has no leftover line breaks.
- Click 'Test Extraction' and save
- Interface Position: Button on the right side of the link input box
- How to operate: Save the window configuration after a successful test.
- Expected Result: Returns successfully, and the extracted proxy details can be seen.
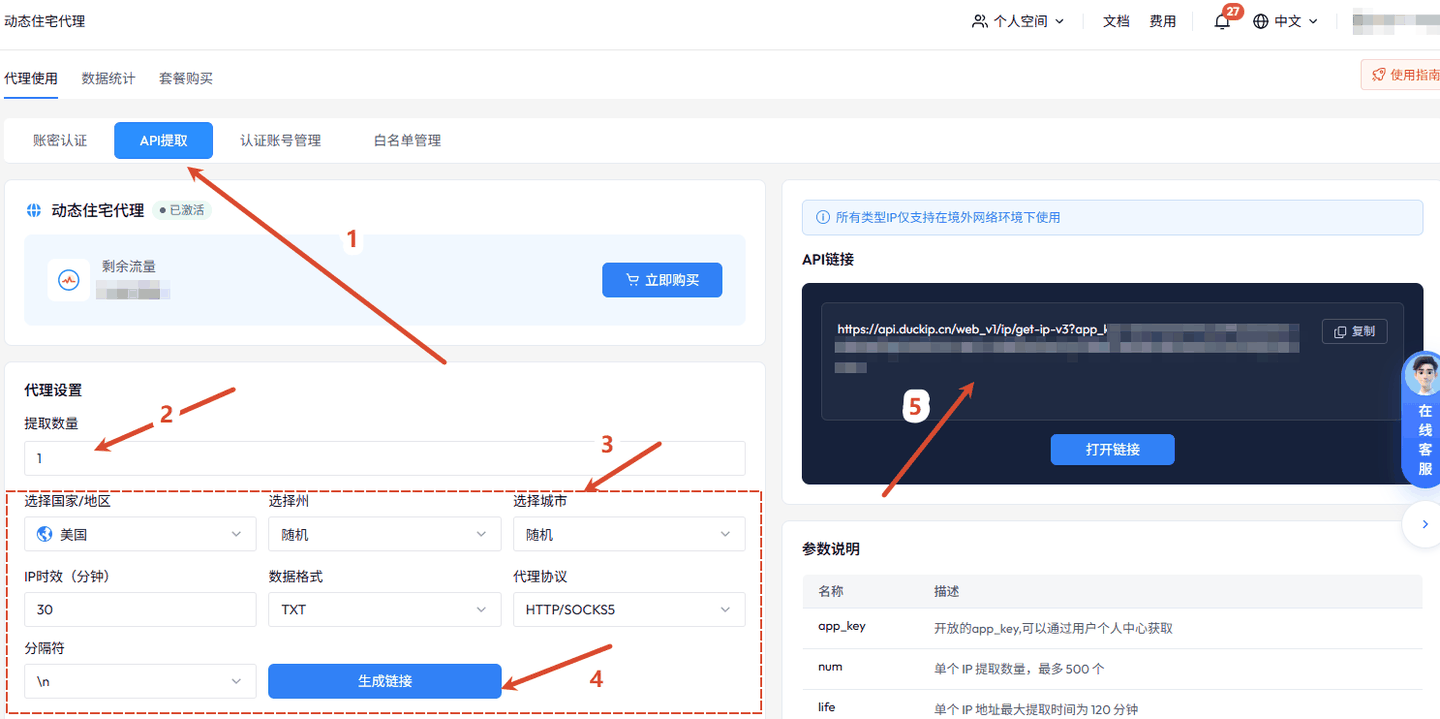
Look at the red marks 1–5 → Enter API extraction → Set extraction quantity (1) → Select country/state/city → Generate link → Copy link
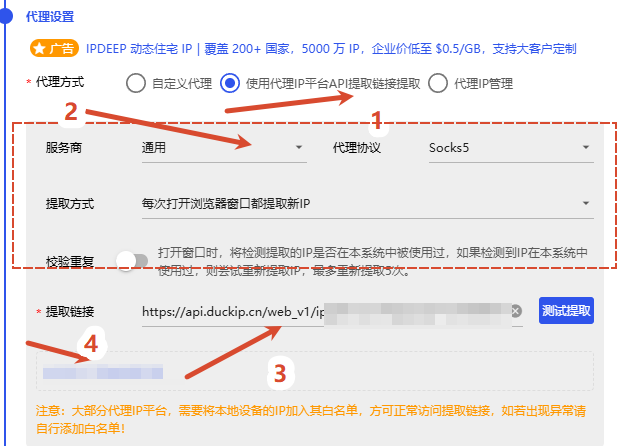
Refer to red marks 1–4 and the 'Verify Duplicates' instructions. For the proxy method, select 'Use proxy IP platform API to extract links' → choose the service provider and protocol → paste the extraction link → click 'Test Extraction'
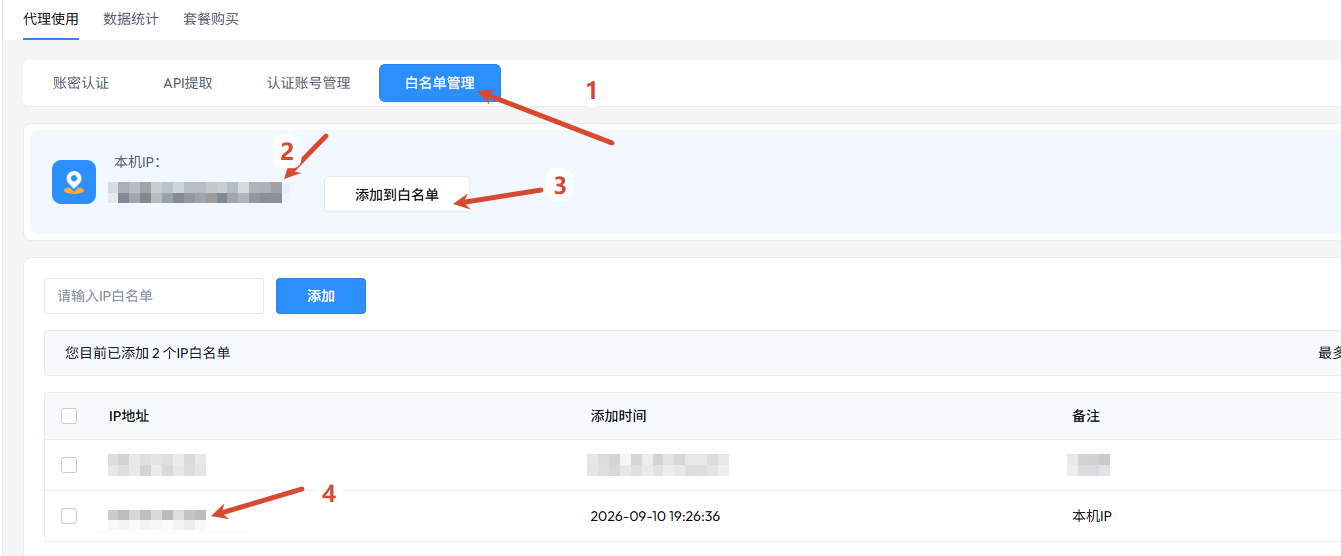
See the usage instructions in the remarks column. Before extracting via the API, the egress IPs of the upstream nodes must be added to the whitelist; 2 entries have been added in the example.
Two Preconditions for API Extraction Method ① The extraction quantity must be 1, otherwise the egress IP of the same window will drift; ② The whitelist must match the egress IP of the upstream node, and it must be updated synchronously after the upstream IP changes.
Step 4: Fingerprint Setup
- Switch to the 'Fingerprint Settings' tab
- Interface Location: The tab bar within the create window popup
- How to operate: First set the basic items (kernel version / operating system / UA / language / time zone), then expand the advanced items.
- Expected Result: Basic items are consistent with the target market.
- Let the time zone and language follow the proxy country
- Interface Location: "Time Zone" and "Language" dropdown boxes
- How to operate: Select according to the proxy exit country, for example, choose German for a German proxy. German time zone.
- Expected Result: Time zone and language do not form a cross-country combination.
- Handling WebRTC and Geolocation
- Interface Location: "WebRTC" "Geolocation" options
- How to operate: In WebRTC, choose to disable or follow the proxy; for geolocation, choose based on IP.
- Expected Result: The detection site does not expose the real internal network IP.
- Keep advanced items random / off
- Interface Location: Resolution, Fonts, Canvas, WebGL, AudioContext, Media Devices, Speech Voices
- How to operate: Keep the default random setting or turn it off.
- Tip: Do not use exactly the same values for all windows in the same batch.
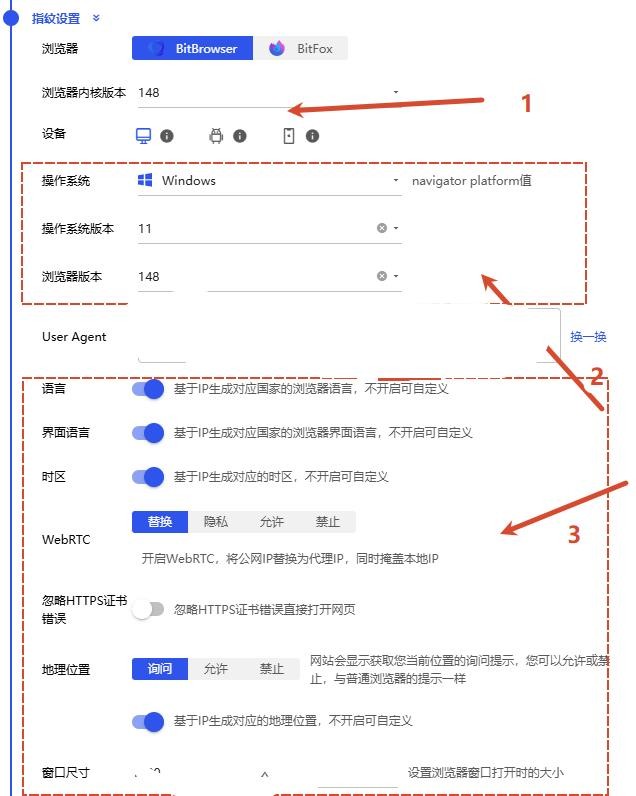
View language, time zone, WebRTC, and geographic location. Kernel version, operating system, UA, language, time zone, WebRTC, geographic location, etc. can be configured.
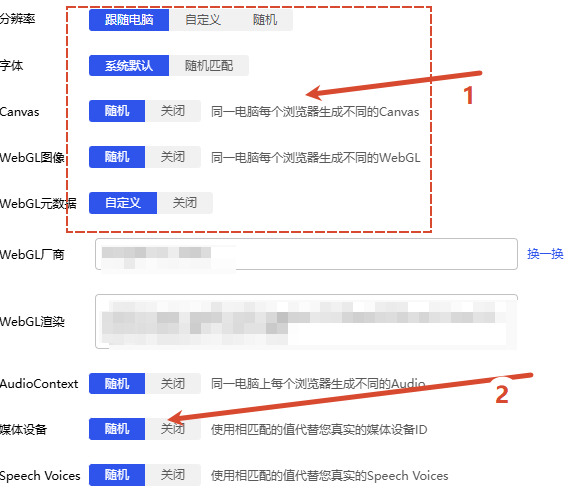
Viewing Canvas and media device values: resolution, fonts, Canvas, WebGL, AudioContext, media devices, Speech Voices, etc. are recommended to remain random / disabled
Step 5: Open the window and verify the IP location
- Click 'Open' in the window
- Interface Location: The "Open" column in the window list
- How to operate: Wait for the browser to start.
- Expected Result: The workstation displays the proxy and fingerprint information of this window.
- Confirm egress IP and quality inspection
- Interface Location: Workbench / Detection Page
- How to operate: Check the IP quality test results and the destination country.
- Expected result: The egress country, time zone, language, and latitude and longitude are consistent with the target area.
- Refresh network information when needed
- Interface Location: 'Refresh Network Information' and 'Proxy Again' on the workbench
- How to operate: Refresh once when the network environment changes.
- Expected Result: The output still meets expectations after refresh.
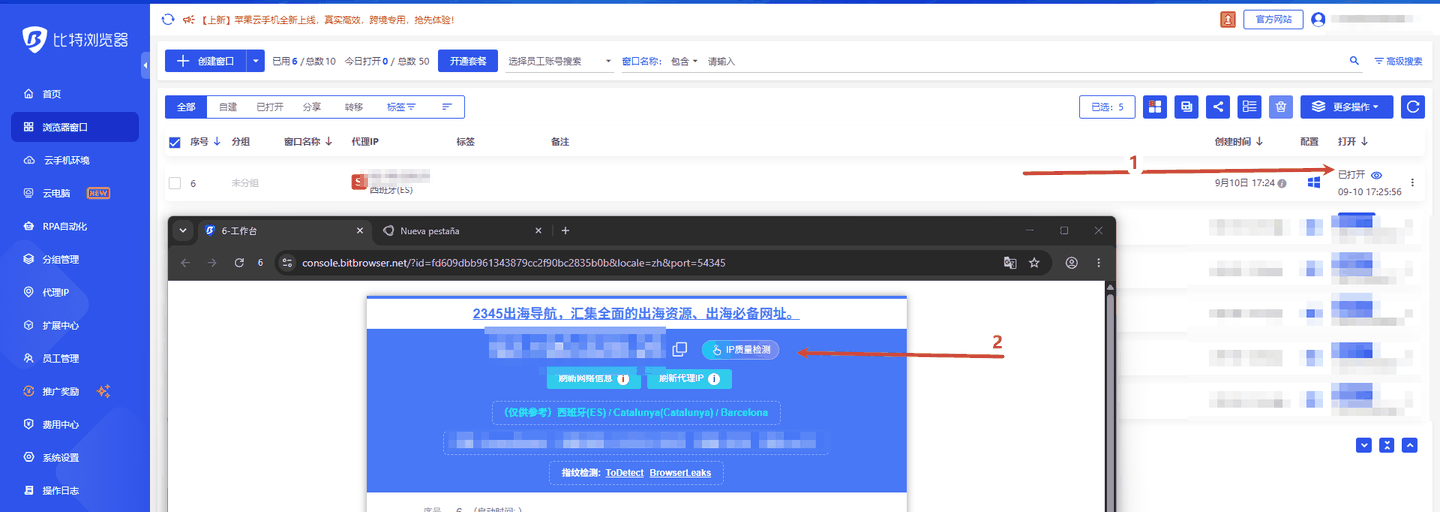
Check the detected country and city to confirm that the egress country/city matches the settings, then start operating the account
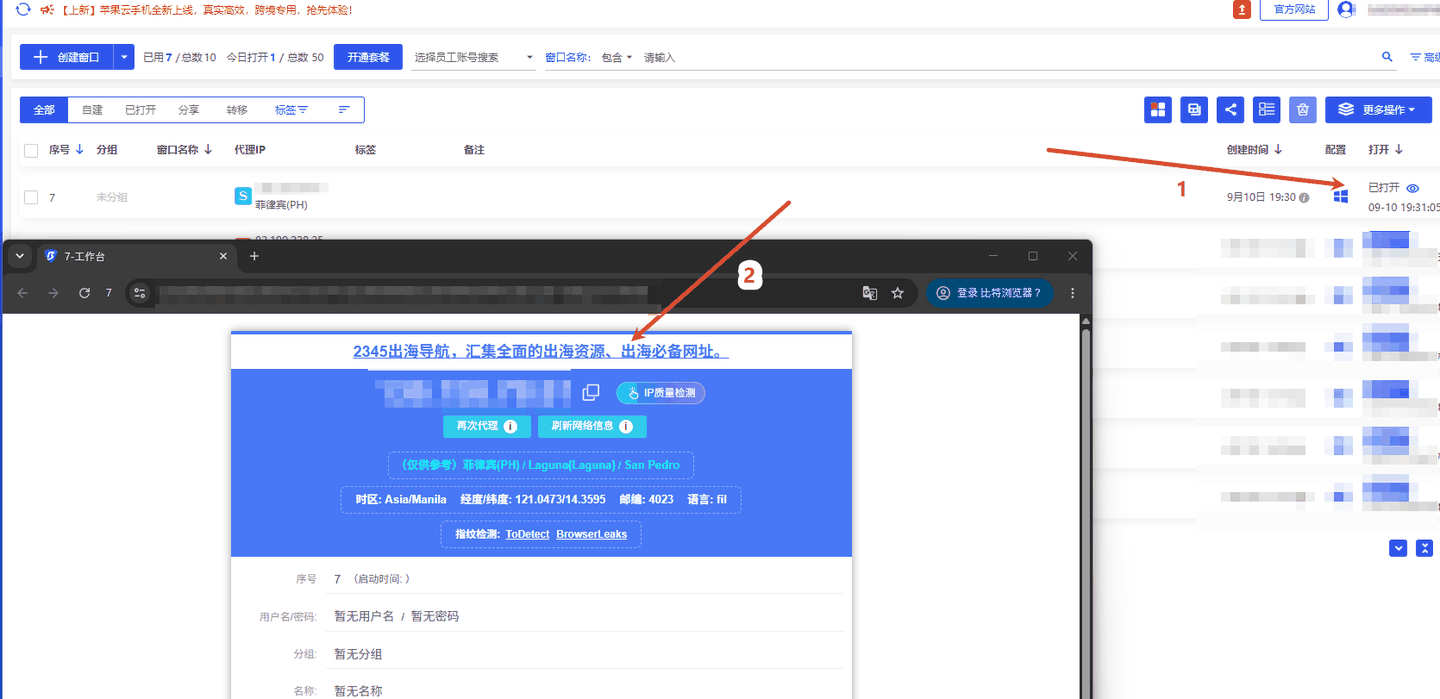
Look at the red marks 1–2. In the inspection panel after entering the workbench, you can enter the workbench from the "Open" column to check IP quality inspection, refresh network information, and view results for time zone / language / latitude and longitude / fingerprint detection.
Common Questions About Bit Browser
| Phenomenon | Cause | Resolution |
|---|---|---|
| Proxy detection failed | Host / port / account password copied incompletely, or the wrong protocol was used | Re-copy from the dashboard; first switch between HTTP and SOCKS5 to test. |
| No network after the window opens | The prior network environment is abnormal, or the proxy bound to this environment has been deleted | First, verify with curl in the terminal using the same parameters, then check the window settings again. |
| IP duplication after batch creation | The same proxy or session was shared during batch creation | Assign separate proxy entries and sessions to each window. |
| API extraction prompt authentication failed | Whitelist not effective or the upstream IP has changed | Check the current outgoing IP in the whitelist management and update it. |
| Extracted IP duplicates history | 'Check duplicates' not enabled | Enable 'Check duplicates' in the API extraction settings and pay attention to the additional extraction attempts. |
Related Documents Overview & Connectivity Check | API Extraction & Code Integration | Account & Password Authentication Extraction